Materials and tools pastes and gels for working on glass jars glass bottles glass sequins rhinestones buttons shells glass soutache braid cord. We transfer the image to the tree Gel medium raphael


I use these gels. Their official appointment is given below. I will just share my impressions.
Thick shiny gel MEDIUM "Liquid glass", 125 ml
My favorite gel. Sticks better than PVA. I had to glue the booties using the parchment technique. A very hard tracing paper was better suited to this particular gel. There is no replacement for him when gluing rhinestones, beads, ribbons, etc. I apply it with a toothpick if the detail is small. Perfectly creates relief on glass. It must be laid out with a brush, and then shaped with a palette knife or toothpick. I'll do a tutorial later. Or see my mugs.

This is what the gel looks like after drying.

Already 4 years on the mirror in the bathroom. Glass gel - nothing. But the matte peeled off slightly (see the vertical stripe at the top left)

Thick matting gel, 125 ml
Draw flat. Creates a frosted glass effect. But strokes are visible, so it is more suitable for painting. I work with a brush, then outline, preferably white or silver. Gouache or other water-based paint can be added to the gel. (I will put a candlestick - look)
But compared to glass gel, it is rather weak for water. But you can wash. I have been painting door glass with it for many years. Over time, it can flake off when rubbed.
I don’t advise you to glue rhinestones on it, it’s not desirable to apply a thick layer, because the clot resembles a “snot” with its dullness. Here, not everything is as smooth as they write. But overall not bad.

This is how matte gel lays down

Crystal paste MEDIUM /№727 b.125ml (Italy)
Looks nice for decoration. I advise you to take the kit.

Crystal paste. Ball diameter 1mm

Contour paint for glass and ceramics Decola, 18 ml
Different colors.
Easy to use. Small details can be drawn with a toothpick or a needle, after squeezing the paint onto a piece of paper.
Outline work

Gels with gouache. Just blot the brush after washing. Extra water is not needed.
The trees and snow on the roof are made with "super light medium paste". The exact name is "MEDIUM Light Paste". Looks just like other gels. Used for modeling, to obtain greater thickness without significantly increasing the weight of the work. It has a soft texture and high adhesive power and is widely used in mosaics, where it is used as a primer. The paste is elastic, flexible and waterproof. Can hold any type of material. Works well on both rigid and flexible substrates. Dries quickly in the air, in proportion to the superimposed layer. Recommended for creating volume in paintings. Good pasta.

I'll post the workflow later. This topic will be updated further.

Painting on the door. She is already 3 years old

Glasses. Lace. Everything is glued on glass gel.

Below are the official descriptions of the materials. Copied from sale sites:
Thick shiny gel MEDIUM "Liquid glass", 125 ml
structural paste
allows you to create unique decorative effects, such as getting
Effect
"Liquid glass". Glasses in doll glasses, thin wings of a butterfly, windows in
toy house...
When solidified, the medium becomes transparent and solid like
glass. Universal product, suitable for
use on any surfaces in various techniques. Great
fits like
to imitate glass surfaces, and to add relief
directly to smooth glass. Can be used as a bulk
glue
for working with rhinestones, pebbles and other decorative elements.
Time
drying depends on the thickness of the layer.
Methods of application and
order
works:
Work with the medium with a palette knife or a flat brush. gel can
mix with acrylic paint
to create colored relief strokes. To simulate thin
glass, composition
evenly applied to a thin transparent or colored film, together with
which
dries out irreversibly. When using a medium as an adhesive, apply
gel on
right place, paste the decor and wait a few hours until complete
drying. During operation, the bank should be well
close in order to avoid solidification of the funds directly in the bank.
Producer: Maimeri, Italy.
Not
Shipment at sub-zero temperatures is recommended.
Description: acrylic
high viscosity matting gel used in painting and decoration
various surfaces. Can be mixed with any water based paints
basis. Dulls the shine of paints, creates a matte appearance of the surface after
drying. Applied with a brush or palette knife.
Crystal paste MEDIUM /№727 b.125ml (Italy)
Viscous, iridescent, paste containing tiny glass
balls. Perfectly sticks to any surfaces, including glass. Attaches,
decorating surface, bright and shiny appearance. Can be applied together
with paints on wood and glass, although by itself, gives beautiful
results. You can apply this paste with a palette knife or brush.
Ready to use. Drying time depends on the thickness of the layer.
At
applied to a colored substrate, the balls project colors and give an effect
crystals.
"Light paste MEDIUM" Thick very light paste. Particularly recommended for body painting as it is specifically light in weight so it does not add weight finished work. Provides uniform application over the entire surface. Sticks well to any surface. Drying time depends on the thickness of the applied layer. Can be overcoated after drying or mixed with any water-based paint.
Description: contour paint in
tube with a tapered tip for drawing fine lines.
Please select a color when ordering.
I translated an image printed on a regular laser printer. In the future I think to find jet printer for printing color images. Don't forget to flip the image horizontally. Well, I also made a small tonal correction in the bright side.
The surface onto which the image is to be transferred must be smooth. I used 120 grit sandpaper.

Main element technological process- gel medium. When I found a needlework shop in my city and asked the seller to give me a medium gel, he asked me a question that baffled me: "What do you like?". "Well, it's just written on the Internet - gel medium. Let me translate the pictures." Then it was the seller's turn to be surprised. It turned out that the translation of pictures is just a side effect that the seller had not heard of before, but in general the gel is used for various effects "under glass" and "with rhinestones". From the whole set of gels, I chose a transparent glossy acrylic medium. It turned out he was not mistaken. The gel itself is similar to sour cream. And consistency, and color, and the same opaque.


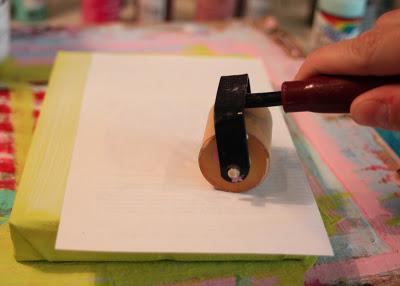
We glue the sheet with the image and drive out the bubbles with a roller.

The idea of the method is that the top layer of paper carrying the image is pasted into a medium (liquid glass). After complete solidification (we left the blanks to dry overnight), you only need to remove the layer of paper. To do this, the paper is soaked and rolled with your fingers. I used the rough side of the dishwashing sponge. Here it is necessary not to overdo it and not damage the image itself. But this is not a particular problem, the image is quite stable.

We have done many paper removal experiments. The sponge showed itself with the best side. But when the paper was rolled up with fingers, a small paper pile remained, which rose when the varnish was applied.
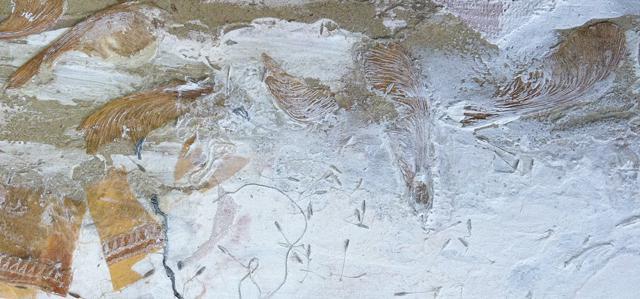
After removing the paper, only the printer's ink remains, glued into the liquid glass. At the same time, after drying, the gel became transparent and the structure of the tree is clearly visible.


I must say that the technology is quite effective. The whole process takes two evenings. The image is translated clearly, not blurry. One jar of gel with a volume of 125 ml and a cost of 480 rubles was enough for 9 sheets of A4. The only inconvenience is that the image may be damaged when the paper is removed.
It remains only to cut off the excess.


Now, owning the technology, you can think about its application. For example, jewelry boxes or original labeling of products.

You can purchase some items from this blog in our VKontakte group:
The creativity of people is limitless. Someone plays the piano, others knit or sew, and still others are engaged in artistic painting of spoons. There are also those who decorate. Every hobby has its own set. necessary tools. For some of them, it is necessary to have a jar labeled "acrylic gel medium". The name itself is intriguing. So what is it? Where is it applied? Which gel medium is better to choose? The answers to these questions can be found below.
Golden mean
Gel-medium is one of the types of modeling pastes based on acrylic. The scope of its application is very wide. Often it is used to give volume or the necessary relief to any surface. When applied to paper, cardboard or fabric, you can achieve a very unexpected and interesting effect. These, of course, are not all areas where you can apply it, but you should first talk about what kind of miracle paste it is.
So, the mysterious inscription "acrylic gel-medium" on the jar is not so mysterious. The meaning of the word "gel" is already clear, it indicates the consistency of the contents of the container. "Medium" is translated as "middle" or "middle", that is, it is something that is or is located between some other elements, and "acrylic" indicates the basic component of the composition. Together they form the necessary material for creativity. Such jars can be found in the arsenal of decoupage, decorating and scrapbooking masters. Artists also often use it in their work to give them volume. Speaking in general terms, the gel medium is, perhaps, an important and necessary attribute of a true creator.
Applications
Knowing the areas where such a paste is used, now you need to decide how exactly it can be used.
A gel medium is used to transfer photographs using the decoupage technique. With its help, drawings from special napkins or paper are transferred to the desired surface (box, plate, and so on). It can also be used to create the look of "worn" and "battered" that is characteristic of vintage style work. With it, you can achieve the effect of "glass" or transparency. Such pastes are great for creating various effects and in other types of creativity.
With the help of this gel, you can breed in all types artwork. This makes them more liquid and easy to apply to canvas or other surface. It is also used to create softer and more delicate shades. Artists can create imitations of sand or wood with some types of pastes.
On the gel medium, you can even glue the elements of the composition in decorating or scrapbooking. It serves as a composition for creating relief through various stencils. They cover individual elements of the work. It can also be used as a top coat, it can easily replace varnish, which dries for a long time and smells unpleasant.
In a rather rare, but interesting "sgrafitto" technique, using gel mediums, you can make wall and ceiling bas-reliefs.
Acrylic variety
In addition to classic mediums, there are pastes with special effects. For example, a cracked surface or sand. You can find options with sparkles or other decorative additives that make the scope of such a product even wider.

How to choose the right gel medium?
To do right choice, you need to decide on the type of creativity for which this paste will be bought. Artists, decoupage artists or decorators will choose gels of various price categories, features and composition. Therefore, there is no clear scheme in this process, although there are several rules that can be followed to avoid disappointment after the purchase.
Firstly, it is better to purchase such products in specialized stores for creativity. Here it is more likely that all conditions for proper storage are met. If the product is overfrozen or stored for a long time in the sun, this will spoil the consistency of the paste. It will crack and clump together, which when diluted with water will make the texture not dense enough and unsuitable for work. Secondly, do not save too much on the medium. Its qualities will affect the result of your labors. The better the composition and characteristics of the paste, the more beautiful the work will look in the end. Thirdly, always look at the expiration date. Gels-mediums, although they can be stored for years, but after the expiration of this date become unusable. You also need to remember that such a product will not end in 1-3 times of use, so it’s better to have at least 6-10 months of stock, otherwise you just might not have time to use it up to the end.
Which medium to choose?
Of course, a good and high-quality gel medium costs money. As a rule, many people try to save money and use acrylic paint thinner instead. A positive effect with such a replacement is unlikely to work. To save money without sacrificing quality, you should pay attention to the Raphael gel medium. This is a domestic brand that has established itself on the good side in the market for goods for creativity. This is not the cheapest option, but this brand is time-tested and used in the work of many authors and craftsmen.

Where can you buy this paste?
Gel-medium "Rafael" can be bought in stores for artists or for creativity. In ordinary stationery boutiques, it is sold extremely rarely. You can also find it in a specialized online store or try to order it directly through the manufacturer's website.
With a minimum amount of material and time spent, you can make a memorable gift or decoration in retro style for your interior with your own hands. The tree will give the shot a special inner glow, and you will also get beautiful matte shades on the transferred frame. This is a step-by-step illustrated master class on creating real works of art with your own hands.
You learn:
- Choose color images to transfer to the tree;
- Work with a gel medium (gel medium transfer - transfer gel, gel for transferring images; freely sold in Runet);
- Transfer any image to the surface;
- Competently complete the work of transferring the image to the surface.
1. Choose the right source materials.
The wooden base can be of any shape, but its surface must be perfectly smooth so that the image lies evenly and without breaks in every sense. It is also preferable to use a light wood, because it is it that gives the very “inner glow”. A light base is especially important for portraits so that the skin tone does not change for the worse.
As for the photograph, it must be a printout on a laser printer and from the very beginning of a size equal to the size of the wooden base for transfer. Therefore, after printing, it is good to cut off the excess from the frame white paper to make it easier to work with later. The picture should be standard high-contrast (you can process the image in graphics editor on PC if it is not). But a great retro effect is given on the tree and the pictures are almost out of focus and with very soft shades of colors. See below for examples of suitable shots - from bottom to top and from right to left: contrast shot, but out of focus; the picture is out of focus and with soft shades; contrast shot in perfect focus. The tree will enhance the color rendition in any case.

Any transfer medium can be used, but best picture gives a gel with a matte effect (marked "matt" on the package) and the most dense / thick consistency (marked "heavy" on the package).
Also to you come in handy:
- unnecessary plastic roller,
- (or) a wide wooden stick (bought at a pharmacy),
- a pair of medium-sized flat brushes for applying the composition (glue brushes),
- non-rigid sponge or sponge for dishes (new),
- water in a small bowl or a low glass,
- paper towels/napkins/handkerchiefs/toilet paper or thin kitchen towels,
- a small amount of oil (any liquid from the kitchen).
2. Right before you start, wipe your wood base several times with a clean, dry towel to remove any crumbs and dust.
3. Apply the transfer gel on the surface of the wood in a good layer: definitely not thin (much wood should not be visible through the gel), but not very thick (the gel layer should also not look like an impenetrable icing on the cake). Just squeeze out of the tube or put the gel with a spoon from the container onto a tree, and then distribute it in a more or less even layer with a brush (or a wooden stick, or a plastic card - whichever is more convenient for you). Do not forget to make sure that the layer on the edges of the wooden base is not thinner than in the middle.

4. While the gel is still damp, place the print side down on the gel. The image can be cropped to a size slightly smaller (or much smaller) than the wooden base, then you end up with a thin or wide wooden frame around the image. Gently with your fingers (in order not to move the picture even a millimeter, hold it with one hand, gently smooth it in all directions with the other), smooth the superimposed photo, slightly pressing it to the surface and removing the air between the photo and the gel on the tree. It is important in no case to press so hard that the gel begins to squeeze out on the sides!

5. Smoothed out with your fingers, take a plastic card (it is more convenient than a stick, because the first side gives more uniform pressure) and, again holding the picture with one hand, continue smoothing the white surface of the photo with the other side of the card.

6. After that, set your workpiece aside until the gel is COMPLETELY dry overnight. Resist the temptation to pick up the photo and see what happens: you will ruin your work for sure. If you work in the summer, you can also put the workpiece in the sun for a couple of hours (but not on the battery !!) and then check the degree of drying, and this may (!) be enough.
7. After the gel is COMPLETELY dry, take a sponge, moisten its edge a little in water (do not soak it with water, just moisten it) and start applying water directly to the back white surface of the photo on the tree. Do this carefully in several passes (wetting the sponge several times), first blotting the picture with a sponge, and then, when there is already a lot of water on the paper, continuing to move in neat circular motions. That is why - so that the material does not immediately begin to be erased by pellets from water - it is necessary to print the picture initially on special paper for photographs, and not on ordinary office paper. Make sure to use the soft part of the sponge and not the hard part of the sponge. In the process, when squeezing the sponge, a whitish liquid will flow into the glass, and this is normal. The paper should be completely wet everywhere from the center to the edges without gaps.

8. Further, still continuing to moisten the sponge from time to time, begin to wipe the wet paper from the image with pellets. Make sure you work not only in one central zone, but equally on the edges so that the paper does not rub off in one place, because you may start to delete your transferred image. Do not be especially afraid of this, rub with light pressure, and the paper will come off quickly, the main thing is not to rub one place with effort, as if you are rubbing a stain; in particular, do not rub where the paper is no longer there.


The paper should thus come off completely. If there are areas that don't want to rub off, use your own dampened fingers as they are smoother and feel better for pressure and progress.

Run the sponge over the picture without pressing to remove all the pellets down to the small ones, and then without pressing with wet fingers on the same surface to make sure by texture that there is no more paper left, even a thin layer.
Wipe the image with a clean, thin towel to remove paper dust and moisture.
At the end of this stage, moisten your fingers again and walk several times again, but almost completely without pressure, over the image, because the paper hairs probably still remain: while the paper is wet, it is not visible, but when it dries, it will become very noticeable if left on the image.
9. Dry the picture on the tree again with a thin towel. Set aside the tree with the image until completely dry from moisture.
10. As you can see in the picture below, even if you rub very carefully, after drying, some paper fibers still "appear" in the image. You can use the water again and then dry the picture again. But here's another, more efficient completion technique.
With one finger, pick up literally a couple of drops of oil and gently apply it to the picture in a circular motion. And as you work, you will see how these villi simply disappear. You have achieved the result you need - take a thin towel (paper or fabric) and start wiping the oil from the picture with the tip.


11. If during work, nevertheless, a small amount of gel has gone beyond the edges of the image on a wooden base, just gently pick up the frozen lumps of gel with your fingers.
12. By and large, the work is finished. But now you can decorate the frame, for example, using a special ornamental adhesive tape with a pattern - washi-tape (freely sold in Runet). Here the frame is presented as an abstraction, repeating and shading the colors of the image. It is also convenient to glue the side edges of the wooden base with it. You can also use acrylic paint instead of ribbons. It is also worth painting the back of the tree with one color.


-
 Open a tattoo parlor business plan
-
 Confectionery business plan with calculations - how to open a confectionery business plan for a home confectionery sample with calculations
-
 Business plan for a tire shop What you need for a truck tire fitting
-
 How to open a taxi service: the nuances of doing business
Popular
- The most promising business ideas from America
- How to open a .DSF file? How to open DSF? Sponsor Information
- Features of the presentation of tourism services on the example of the travel agency "Hot Tours" (g
- Ideas for starting a business in the USA Idea #1
- Urgent order of a gazelle cargo taxi24
- How much does a YouTube channel earn?
- Features and organization of the case
- Which product is profitable to trade: an overview of profitable areas for trading
- What can you sell in a small town
- How to start a new business from scratch - business ideas