Duck nests with hand sizes. Providing ducks with homemade nests
In order for ducks to rush in nests, you need to try to equip them properly. In addition to the fact that duck nests should be comfortable and properly built, they should be located in certain places. You should also spend time on accustoming feathered pets to rush in nests. But, let's talk about everything in more detail.
You can look at photos of well-built nests for ducks an infinite number of times, but still not be able to reproduce this design. And the thing is that a properly made nest must meet certain requirements.
Few people know that the nest should be built in such a way that it has a roof. In this case, the laying hen believes that she is not in any danger. And if you put the nest in a secluded corner of the barn, then you get a secluded place at all.
The presence of a nut is another nuance that must be taken into account. In nests with a flat bottom, there is a high probability that a laid egg will roll out of them. Accordingly, it may be damaged, and subsequently the duck will not perceive such a nest as a safe place.
Where to put the nest
Before you start making a duck nest with your own hands, you need to decide on its location. This will ultimately help you choose optimal dimensions. Do not place nests in places where moisture constantly accumulates. Birds do not like to rush near the passage, so you should pay attention to places that are farthest from doors and passages.
Where ducks rush, the light should be dimmed even during the day. If a large number of windows in the house do not allow you to find such a place, then some of them should be shaded. Birds are reluctant to rush where it is constantly noisy.
When considering where to put nests for ducks, you need to understand how many there will be at all. The math here is easy. For every duck in the house that lays eggs, a nest should be placed. If there are not enough nests, the birds will start looking for another place. As a result, the poultry breeder will begin to find duck eggs in the garden and under bushes, and it is a very difficult task to teach a duck to rush in the poultry house, which has begun to lay eggs on the side.
Since it is systematically necessary to change the litter in the nest and collect eggs, there must be an easy passage to it. It is necessary to choose a place, the approach to which will be free and, at the same time, it should be secluded.
A duck will only lay eggs where it considers itself protected.
We make a nest with our own hands
Before you start making duck nests with your own hands, you should consider what building materials will be used. The most affordable and cheapest to date construction material, suitable for nests, is a tree. Any sheets of plywood that are in almost every yard, fiberboard and chipboard, etc. will suit us.
The next step is to imagine what the design will look like. And to take into account all the details, it is better to draw a diagram. Since ducks of each breed grow to different sizes, the dimensions of an adult female should be taken into account when building nests. Experts say that the width of the nest should be 50 cm, depth - 40 cm, height - 40 cm, but these are only recommendations. In each individual case, it is necessary to proceed from the characteristics of the duck breed and the availability of free space in the house.
In addition to plywood or any other alternative material, you will need:
- 6 wooden slats, the length of which is 40 cm:
- 2 wooden slats, the length of which is 50 cm;
- self-tapping screws;
- saw;
- tape measure and pencil.
The dimensions of the wooden slats are indicated on the basis that the dimensions of the nest will correspond to those described above.
Nest building
By and large, the nest has the shape of an ordinary box. First of all, the sides of the box are made, having the shape of a square with a side of 40 cm.
In order for the duck to readily rush in the nest, you need to make a convenient hole through which the bird will enter it. To do this, a square with a side of 17 cm is cut out in one of the side walls. Usually, any duck can easily pass into such a hole. If the poultry farmer keeps some extremely large breed, then the hole can be increased by several centimeters. So that the eggs do not roll out of the nest, leave a threshold 9 cm high.
At the next stage, you need to cut out two opposite walls of the structure, the width of which is 50 and the height is 40 cm. These parts must be solid, without manholes, windows and other holes. It is possible, in the absence of a single piece of plywood of this size, to make side walls from several parts. Then they make a roof 40 wide and 50 cm long.
It remains to make a frame for which wooden slats are needed, and fix all previously made parts on it. bottom in makeshift nest you can not do it if the poultry house has well-equipped floors. But it is better to attach the bottom to the box, after laying it with a piece of linoleum or any other material that does not allow moisture to pass through. In such a nest it will be easier to maintain cleanliness.
Nest arrangement
It should be comfortable in the nest, otherwise the duck will not sit there, so the bottom of the do-it-yourself structure is covered with straw. The bedding layer should be thick enough. This requirement is due to several factors. First of all, it is worth noting that the softer it is in the nest, the faster it will be possible to plant a hen there.
The second argument in favor of thick litter is that it will help minimize the chance of egg damage. Many ducks try to bury their eggs in the straw. If the litter is thin, then in fact the eggs are under it. And in contact with wooden structural elements, the shell may lose its color.
Important nuances
Making a nest at home is easy. But sometimes it is almost impossible to force a duck to sit there. If it becomes obvious that the bird does not want to go into a brand new box, but with pleasure sits in an old basket made of vines, then it is worth laying straw there and putting it in the house. It is almost impossible to make a duck fall in love with a particular box, and it’s not worth wasting time on it, so before you start building a box with your own hands, you should take a closer look at the behavior of birds and their favorite boxes and boxes.
Choosing a place is also sometimes better to entrust feathered pets. Not always those places in the house that seem safe for humans look the same for birds. If, contrary to all the statements of experts, the duck prefers to rush near the entrance, it is better to put a box made at home there.
Many poultry farmers make the mistake of placing all the nests close to each other. This is undoubtedly convenient for the person who will collect the eggs. But the birds living in the neighborhood are reluctant to rush. Each nest should be in a secluded place, and it should be positioned so that the side with the hole is turned not towards the entrance, but towards the wall. The duck should not be distracted by anything. And in general, you should look into the barn only if necessary.
You should not collect eggs when all the ducks are in the barn. They regard such actions as theft, which encourages them to start hiding eggs. Accordingly, they begin to rush anywhere, but not in the place designated for this. If there are a lot of birds, then you need to collect eggs daily, but at the same time, while the birds are walking in the corral. If there are few laying hens, then it is enough to collect eggs once every 2 days.
If the duck begins to pluck the fluff and pave the nest with it, then it is preparing to hatch the ducklings.
We teach the duck to rush in the nest
Sometimes the birds at first glance at the box understand why they put it in the house. Sometimes the birds have to explain where to carry the eggs. This process is simple, but laborious. In winter, the bird does not rush. But to equip the house with nests should be in the fall. During the winter, each duck will choose a house that she likes, and with the onset of spring, she will begin to rush there.
You should also leave a hint for the duck in the form of an egg. They used to leave a real egg, but over time it deteriorates and needs to be replaced with a new one. It is much better to use a model made of plaster, wood or chalk for this purpose. Such an egg can be made independently at home.
Some poultry houses shut down a duck that does not want to lay in its proper place in the poultry house for a while. This method quite often gives the desired result.
Conclusion
Currently, there are many photo and video tutorials on the Internet. However, the nest for any bird is a simple design that even a woman can make at home, and for this it is not necessary to watch colorful videos. But to make a duck rush in a box is a more difficult task.
All that is needed is to make sure that the nest is comfortable, put a dummy there duck egg made in life size and draw the attention of pets to the new equipment in the poultry house. Often these actions are enough for the birds to begin to rush only in the places designated for this process.
The productivity and health of poultry is largely dependent on the conditions of detention, and in particular on the premises, and is no exception. In this publication, we will talk about the conditions for keeping domestic ducks, or rather about the premises. Here we will talk about its device, as well as how to build a duck house with our own hands, we will show a photo. For constant year-round keeping of ducks, it is necessary to build a very solid structure that will protect the bird from sudden changes in temperature, drafts and dampness.
Utyatnik - a room for ducks
In general, the device of the duck coop is practically no different from chicken coops, but there are some differences.
The room for ducks, first of all, should protect the bird from sudden changes in temperature and humidity. Since these are the main reasons for the loss of productivity.
Indoors, ducks are usually kept outdoors. In this case, we must not forget about the warm and thick bedding. Ducks should be placed indoors based on the calculation: 2-3 birds per 1 sq.m. free area of the room. The room must be kept dry. In a relatively dry room, the duck will feel good.
As mentioned above, the duck coop is no different from the chicken coop, the main difference lies only in its internal arrangement and equipment. If the herd of ducks is small (up to 10-15 heads), then they can be kept together with other types of birds - chickens, geese, guinea fowls and turkeys. However, the place for ducks will need to be fenced with a partition.
Before equipping a room for ducks, it is necessary to understand some questions: how many birds will be kept, as well as to understand the features of their feeding and watering. Below it will be written about the device of the duckling, what equipment should be there and how to properly prepare it.
The duck house can be made of various materials: boards, logs, bricks, various blocks, etc.
Domestic ducks are not as heat demanding as chickens. However, it is desirable that winter period the temperature in the room did not fall below +5 degrees.
Device and equipment in the duck house
The productivity and health of domestic ducks largely depends on the premises for keeping, and in particular on the equipment and inventory in it. The device in the room for keeping ducks differs significantly from the device of an ordinary chicken coop. The difference lies in various details: feeders, drinkers, nests, various manholes. All these nuances must be taken into account.
The room for ducks should accumulate heat well in cold weather, and it should be cool in the hot season. The floors in the duck house should be quite strong, they should be at least 25 centimeters from ground level. You should also take care that rodents do not enter the room.
Manholes in the direction of the paddock are best arranged on the south side. The height of the manhole from the floor should be at least 5-8 centimeters. The size of the manhole is 40 centimeters high, 30-40 centimeters wide.
Below is a description of the various equipment in the duck house.
Lighting at the duck house
In order to get increased productivity, especially in the winter season, it is necessary to carry out lighting in the duck house. Ducks that are kept indoors with the right lighting are more productive. Light makes you work harder internal organs birds, and especially the ovary, so egg production is much improved.
Lighting is carried out in the duck house, be guided by the calculation: 5 watts per 1 sq. m. The bulbs themselves are placed on the ceiling.
Feeders and drinkers for ducks
A very important point in the device of the duckling is the design of feeders and drinkers. Choosing or making feeders and drinkers for ducks with your own hands, you need to decide on the design. Most importantly, ducks should not be able to scatter food and spill water.
As a rule, duck feeders are made of wood. In order for the birds to have access to food only with their beak, a wooden rail is installed on top. For a visual example, see the design of the feeder in the picture.
 Duck feeders
 An ordinary metal basin can serve as a drinking bowl for ducks at home.
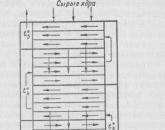
Ducks need nests made of wooden planks. Dimensions: 40x50x20. At the entrance to the nest, a small threshold is made. Duck nests should not be at a height. At best, they should lie on the floor. The only thing to consider is that you need to put more bedding under them than on the main floor. The number of nests in the duck house should come from the number of livestock. 5 ducks need one nest. Nests are usually located not one by one, but whole batteries. See the photo for how it looks.

Do-it-yourself duckling
Before building, you need to choose the right place. It is desirable to build on the south side personal plot, on a small hill. Groundwater must not pass under the building.
Do-it-yourself duckling can be built from any material. Usually, boards are used at home. First, the foundation is poured, then the frame is made, upholstered with boards and the roof is made, but first things first.
The chosen place for the construction of the duck house is covered with rubble or other stone. All this is poured with a solution of cement or liquid clay. Various small pieces of iron or broken glass should also be added to the solution. This will help protect the duck housing from ubiquitous rodents and other small pests.
Paul is ready. Such a floor has many advantages. It is very durable and easy to clean and disinfect.
After that, you need to install the frame and upholster it with boards. In general, the procedure is no different from the construction of an ordinary barn or utility room.
From the inside, the duckling should be well insulated. To do this, you can use special heaters, or you can just sawdust.
In order to avoid drafts, all cracks in the duck house must be sealed. Particular attention should be paid to the window frames and the door. The cracks are sealed with tow.
Also, when building a duck house with your own hands, it is necessary to provide a place for a corral. As mentioned above, it is best to place the corral on the south side, in relation to the building. The zogon should be fenced off with a net, the height of which should be at least 1.5 meters.
Just the other day, on a hunter's day. I got to the exhibition and met guys from the Ministry of Emergency Situations there with a good idea of homemade nests for a wild duck. So we often disturb our dear nature, and we don’t give anything in return for any warmth of the soul. and I thought, but the idea is reasonable, because many in other countries practice, why don't we try it?
With the approach of nesting time for waterfowl, not all of them will find suitable places for their nests. Hunters have developed variants of artificial nests for some species of game birds, primarily for wild ducks. Unfortunately, you will not often find a reservoir of a suitable area with several broods of this bird. Therefore, artificial nests prepared by local hunting ground tenants are indispensable. Perhaps not only hunters will try to attract ducks to the nearest pond, but also “peaceful” citizens will build a makeshift nest for a wild duck. In the summer you can admire the mother with the chicks, and in the spring already on the smart grown ducks.
Why do we need homemade nests
In the last decade, there has been a significant decrease in the number of waterfowl in hunting grounds. The number of wild diving ducks nesting only on the ground (red-headed and tufted duck) has dropped dramatically. River ducks (mallard and two species of teal) are also becoming scarcer. Scientific studies in a number of European countries, where similar processes are observed, have pointed to a significant negative role of predatory animals and people. you can't even say it's scarier!
Making a homemade nest
Making such nests is not difficult, but the benefits of this are very great. First you need to make a wire hoop, the diameter of which should be about 40 cm, then it is braided with cattail leaves, which should be tied into a knot. Through such manipulations, a basket should be obtained in the form of a cone and up to 50 cm deep.
Its bottom is covered with dry grass or leaves. Made baskets should be attached to the branches of the bushes and be sure to cover with branches. Such a duck's nest can last up to 3 years with a occupancy of up to 15%. Thus, it is possible to increase the annual number by 150-200 broods.
The best is considered duck nest tunnel view - cylinders of hay and corridors of boards with an entrance on both sides. This gives the bird the opportunity to escape if attacked. To the birds of prey it is difficult to see the incubating duck if the length of the nest is 80-100 cm. For one cylinder nest, you will need a metal net 2.7x0.8 m, roofing felt 1.5 m, soft wire and hay. The manufacturing process consists of several simple steps.
Twist the network on one side until a pipe with a diameter of 30 cm is formed, and fix it with soft wire in three places.
Lay hay on the untwisted part of the grid with a layer of 3-4 cm.
Put roofing material on top (1.5 m long).
Again put hay 3-4 cm on the roofing material.
Wind the free part of the net with hay and roofing material onto the already finished cylinder from the net and fix it with wire.
To prevent rain from flowing between the twisted layers of roofing material, the joint should be located at the bottom of the future nest. At the ends of the cylinder, 7-8 cm from the selected bottom, pull the wire strongly.
Under the wire, line the bottom of the nest tightly with hay so that the wind cannot blow it out of the cylinder.
For nesting corridor you will need 3.6 m of board (80 80 80 120 cm) 30 cm wide and 2-2.5 cm thick. A wire 7-8 cm from the floor creates a threshold behind which hay is attached for the nest. A log 100-120 cm long and at least 40 cm in diameter can be used for nesting. It is sawn lengthwise and a hollow with a diameter of 30 cm is selected with a chain saw.
It is best to install artificial nests for wild ducks in water bodies with an area of 0.25-2 hectares. They are well engaged in newly formed reservoirs, where ducks have few natural nesting sites. Nests are placed on open water, from a meter to several tens of meters from the reeds, so that the exits are parallel to the overgrown side. You can put them on alloys. At the same time, it is important that stiff stems do not appear in the summer, along which the mink can reach the nest. The period of strong ice is the most convenient time for nesting. The mallard lays early, so the nests must be ready before the ice melts. To protect against minks, a drainpipe 60-70 cm long is put on the pole or upholstered with tin. They also make a funnel of tin 60-70 cm long. Set up a nesting box as follows.
Lower a pillar or two pillars (at least 10 cm in diameter) into the hole and drive it into the ground so that 1-1.3 m remains above the ice.
Put protection against minks on supports.
Nail a board 1.2 m long onto the supports, tie a cylinder of hay tightly to it with soft wire or fasten a corridor of boards.
The support can be either a wooden or a metal pipe. The nest can be mounted on two poles. The mount can be different, but very durable.
Make a threshold by laying enough hay so that the duck understands that there is an entrance and exit on both sides.
Artificial nests, especially from boards, can be made more natural by sheathing them with reeds.
Usually wild ducks nest in tall old grass, under heaps of reeds, so they are reluctant to nest in wooden boxes and other conspicuous man-made structures. To give the nesting place a natural look, it is necessary to sheathe it on the outside with reeds. From above, the reed should protrude to the level of the additive, which will prevent the possibility of landing a marsh harrier on it.
In order to find out in which nests the ducks lived and how their nesting went, the nests are checked after the end of breeding (a disturbed bird often abandons the clutch) - in mid-June.
If, nevertheless, the mallard lingered and is still sitting on the nest, it should not be disturbed. Nesting is considered successful if egg films and small pieces of shell are found in the nests. If predators have visited the nest, then the shell will be scattered over it.
After the season, it is advisable to remove the hay cylinders and store them in a barn in order to put them back at the end of winter. A corridor of planks or a nest in a log can be left for the winter. In all nests, before the start of the new season, it is necessary to check the state of the threshold and whether there is enough hay to create a nest. If in a makeshift nest wild duck nested last year, then the hay needs to be changed. The reed sheathing may also need to be replaced.
This problem it turns out that in our region the ornithologist and head of the RS (Y) Rescue Service of the RS (Y) Nikolay NAKHODKIN is trying to solve it. thanks to which the thought crept into me and why not!
And if our conscientious owners of hunting grounds take this into service!!!
FavoritesEvery year, from the end of February to the beginning of March, female geese begin a period of active egg laying and incubation of chicks. To ensure high egg production, you need to equip a suitable place for masonry. How to properly prepare nests with your own hands will be discussed in this article.
Features of the nest for geese
Geese are one of the most large birds living on a farm, so the nests for them need to be made large and spacious. In order for the female to sit comfortably in the nest for a long time, you need to take a responsible attitude to its arrangement, adhering to all the requirements.
Types of nests
There are many variations of goose nest designs. In each farm or private household, you can equip them, depending on the availability required material and desires of the poultry farmer.
The most common types of nests are described below:
- round, made from an ordinary basket or car tire(or filled with straw);
- with a wooden bottom and slate side walls. From above, the box is also covered with sheets of slate;
- from a construction mesh rolled up in the form of a pipe and fixed with clamps. The structure is attached to a wooden base with wire and lined with straw;
- a number of separate wooden sections with a small entrance and blind partitions - for a large number of geese.

Nest requirements
In order for the place for laying and incubation of eggs to be convenient for the bird, you need to take into account some important points its arrangement.
Did you know? Geese are loyal to one gander. If they lose their male, then for several years they cannot form a pair with another gander.
Here are the basic rules of his equipment:
- Enough space for the bird. The dimensions of a standard goose nest are 50 cm wide, 65-70 cm deep and 60-70 cm high. Depending on whether it will be used for laying eggs or for hatching chicks, the depth can be made more or less.
- Closed back. It is necessary so that nothing frightens the bird and does not distract from behind, as well as to fix the litter at the bottom of the structure.
- Low plank in front. Its height can be from 10 to 15 cm. Such a board is needed to hold the litter.
- High side walls. It is undesirable for a goose hatching eggs to be distracted by external factors. If several goose nests are arranged side by side in the house, then such walls will help the females not to disturb each other.
- Timely preparation. It is necessary to equip suitable places for laying eggs for geese a month before the start of the breeding period birds. Females usually start laying eggs around the end of winter, so nests should be ready by February. The goose must choose one suitable place and rush there.
- Doors on control nests. Necessary for the female to feel completely safe while hatching offspring.
- Convenient entry. So that the laying hen can easily get into the nest, a plank with planks nailed across is laid at an angle in front of the entrance. One edge of the plank rests on the ground, and the other - on the edge of the nest, forming a bridge for a convenient entry of the bird.
- Possibility of choice. In order for a goose to want to incubate eggs, she must like nesting. It is recommended to arrange several sections for birds nearby so that the female can choose the best for herself.

Making a goose nest
To make a good goose nest yourself, you do not need special skills or special materials. Each poultry farmer uses the resources that are at hand. The main rule of manufacture is the choice of natural material that will not let the cold through. that is why most often the places for laying eggs are made of wooden slabs or wicker.
In the shape of a wooden box
You can arrange a warm and cozy place in a wooden box made by yourself.
For this you will need:
- OSB sheet 11 mm thick;
- end saw;
- screwdriver;
- screws;
- slats;
- jigsaw;
- pencil.
Important!The number of nests is determined by the number of geese in the herd. For 3-4 females, one nest will be enough.
The finished box will have dimensions:
- width - 40 cm;
- depth - 60 cm;
- height - 50 cm;
- the height of the upper and lower sides in front - 10 cm each.
Do-it-yourself nests for geese: video
Below is step-by-step instruction for making a wooden box with your own hands:
- Mark the OSB sheet with a pencil into rectangles measuring 40 x 60 cm (2 pcs. - For the bottom and roof), 60 x 50 cm (2 pcs. - For the side walls), 40 x 50 cm (1 pc. - For the back wall), 40 x 10 cm (2 pcs. - for the upper and lower sides).
- Using a jigsaw, cut the OSB sheet into rectangles of the specified size.
- Separately prepare wooden slats certain size for fastening structural parts to each other.
- Using a screwdriver and rails, connect the bottom to the lower side, and the roof to the top.
- Attach the bottom of the box to the back and side walls in the same way, so that the bottom edge is in front. From above, fix the roof of the structure with a screwdriver so that the upper side is located in front above the entrance to the box.
You can make in this way a long one-piece structure for three individual sections separated by partitions.
Woven from twigs
A nest woven from willow twigs has a number of advantages. Females like it, it is easy to make and retains heat well. The walls of such a nest provide good ventilation.
Did you know?Ifconditions of detentiongood ones,Domestic geese can live up to 30 years.
To make a wicker basket for geese at home, you will need:
- fresh willow twigs (thick and thin);
- iron spacer ring (diameter 75 cm);
- awl.
The finished product will be in the form of a basket with dimensions:
- bottom diameter - 70 cm;
- height of sides - 20 cm.
 The step-by-step instructions for weaving are as follows:
- To make the base, weave a cross, giving it the shape of a circle. Take an odd number of willow twigs, of which one will be shorter than the rest.
- To prepare the frame, you need to cut a hole in the center of the three rods and insert three more rods into it. Another one needs to be attached to the side of the cross. All protruding rods must be aligned. On the other hand, place another one in the crevice wicker. It will be needed for braiding.
- To weave the bottom of the basket, the coils must be laid very tightly, and the ends of the rods must be hidden next to the rib. Weave in this way the bottom to the desired size.
- For the side part, take 29 large rods and sharpen them with a knife from one end. Arrange the rods so that the distance between them is the same.
- The edge of the nest must be braided with a pigtail. All edges of the branches stick out of the structure and are cut off after weaving is completed.
- Bend the protruding rays and collect the side rods in one bundle above the basket. Secure the bundle with wire and place a spacer ring inside the product. Fix the ring on the sides so that it does not move during further work on the product.
- To weave the edges of the nest, you need to dissolve the assembled bundle of side rods at a height of 20 cm and braid the edges of the structure with them. Wrap one edge around another, and bend 5 cm near the third edge, cut off. Insert a segment inside the edge parallel to the third edge. Trim the end of the rod and tuck it in. Braid the last rod and trim the protruding edges.
The shape and size of the basket can be chosen at your discretion, making adjustments to this step-by-step instruction.
planting nest
When a goose prepares to hatch chicks, her behavior changes. The female protects her place of laying eggs, flaps her wings when a person appears, almost does not leave the nest and often sits on the eggs. This means it's time to prepare the place.  The process of arranging such a nest has its own characteristics:
- before placing the eggs in the nest, you need to treat it with a disinfectant. For this purpose, a 2% solution of formalin, caustic soda or bleach is used. Soft straw is usually laid at the bottom - it should provide the mother hen with warmth and comfort;
- the front of the nest must be hung with a cloth so that the hen feels calmer;
- put food and water near the female, since the goose rarely leaves her place;
- it is recommended to put a nest in a warm room with heating so that the eggs do not overcool;
- the mother hen will need the nest in which she constantly rushed, otherwise the goose may refuse to hatch offspring;
- nests with different hens should be placed so that the birds do not see each other; so they will be less nervous.
Important!If the female liked the equipped nest, she begins to cover it with her plucked feathers and down.
Installation and arrangement
So that the hen does not get sick and can bring out healthy goslings, a layer of litter must be laid in the nest. It is important to keep it clean and dry at all times. It is recommended to change the bedding every day.
Geese have a habit of laying eggs in the morning, so bedding should be changed in the evening.  The most commonly used materials are:
- straw;
- peat;
- chopped corn;
- sunflower seed husks;
- sand.
At the bottom it is necessary to pour ashes. This will help prevent the growth of harmful microorganisms. Preparing to incubate offspring, the goose plucks out its down and covers the upper part of the nest with it.
Did you know?When building a nest for one goose, up to 40 kg of bedding materials can be used per year.
Where to install nests
Goose nests should be placed directly on the floor. So that the birds are not cold to sit in them, the floor must be insulated. This can be done with a bed of straw or sawdust.
The rules for choosing a place for arranging a goose nest are as follows:
- the selected area should be in twilight;
- there should be no drafts nearby;
- the entrance to the nesting place should be located on the south side;
- should be a good review;
- convenient location of the structure for daily bedding change.
 Sometimes the female does not like the prepared and ideally equipped sections for laying eggs. In this case, she may even begin to rush somewhere on the floor in a dark place. It is impossible to move goose eggs so that the goose does not lose interest in hatching chicks. the arrangement of the place chosen by the female must be carried out in accordance with the requirements described above.
 How to make ventilation
If the room is cool and damp, the straw bedding at the bottom of the nest may become damp. This is facilitated by the fact that the bird with its paws brings dirt from the floor and moisture onto it. Wet litter not only becomes cold, but also serves as a favorable environment for the reproduction of harmful microorganisms, so it needs to be changed daily.
For bedding, it is best to use soft straw. It retains heat well and provides additional ventilation.
Temperature regime
Adult geese perfectly tolerate sub-zero temperatures, but the cold is dangerous for eggs. If they are exposed to low temperatures for a long time, they can freeze, and then it will not work to bring out the goslings.
In rooms with goose nests in the cold season, it is necessary to maintain a positive temperature and warm them well.
Important!Do not place the nest next to cold walls or near doors - there may be drafts.
Eggs should be stored at a temperature not exceeding +12°C. It is best to take them from the nests immediately after laying. So they can be collected for two weeks, and then put on the goose for incubation. 
Female geese are sometimes stubborn when choosing where to lay their eggs. If they do not like the proposed design, they will not want to rush in it (and even more so hatch chicks).
- Each female needs to prepare a personal place (this is ideal).
- You can equip one large structure for 3-4 females if they belong to the same goose family.
- During the short daylight period, lighting is required from 6:00 to 20:00.
- Males should not be allowed near the nests, they irritate the geese.
- So that the female does not refuse to hatch eggs, she cannot be transplanted into someone else's nest.
- To stimulate the goose to lay eggs and hatch chicks, white dummies of eggs are placed on it.
Proper arrangement of nests for geese will help ensure high egg production of birds and make it possible to hatch a sufficient number of chicks.
Breeding indoutok is a fascinating business, and her meat is tasty, nutritious, there is little fat in it. They have not lost their incubation instinct, they are wonderful mothers, so the process does not cause much trouble. You just need to make sure that the ducks can safely incubate their eggs in the allotted places, and do not arrange laying away from home. There it is impossible to control the process and protect the hatched chicks from birds and cats, and for this it is necessary to properly equip their nest. How to make it with your own hands so that the bird likes it, and she safely breeds?
Indo-ducks and common ducks require the construction of nests for laying eggs
Nest requirements
There are no special requirements for nests of waterfowl, they must meet the usual criteria, the same for all birds rushing at home:
- the location of the nest must be dry;
- needed thick layer bedding so that fragile eggs are not damaged;
- it is good if the nest is located away from the passage;
- the number of nests must be calculated so that they are enough for each laying hen.
Peace, silence, subdued light and solitude for Muscovy ducks are especially important, therefore, during the period of laying and incubation, it is imperative to provide them with these conditions.
But offspring can not wait at all, since the eggs can be damaged, and on the way to the house of defenseless chicks, many dangers await. Yes, and the mother hen herself will have a hard time, she is not able to resist or run away from a predator at the time of incubation.
Therefore, building a nest is a responsible issue, it must be approached with all seriousness.

If the duck does not like the proposed nest, she will make it herself in a secluded corner
Duck room
Do not forget that the productivity of a bird depends on the care and maintenance, therefore, requirements are also imposed on the room where the nests will be located:
- The shed where the ducks are placed should be warm, made of environmentally friendly material.
- It is desirable that the birds be kept in it separately from other birds, since serious battles often flare up between males of other poultry, and peace and solitude are necessary for hens.
- In the nesting area, it is required to keep clean, regularly change the litter, ventilate and disinfect. The number of hatched eggs is affected by light, windows are needed to provide it.
- Dampness in the barn for ducks is detrimental, the limit of permissible humidity in the room is 70%.
- Earthen floors are undesirable for ducks, since in spring and autumn, from excessive moisture on the street, it will become damp, and this will contribute to the spread of dirt.
- A bird with a wet belly and paws will stain the eggs, this will certainly affect their hatchability, and its health too.
- It is better to make the floor wooden, with a slight rise from the ground level, then it will always be dry, and even if the ducks get carried away, splashing at the drinker, the moisture will not spread throughout the barn.
- All cracks and holes in the floor must be sealed in order to minimize access to rodents.
- On hot days, provide access to fresh air.
- A feeder, a drinking bowl, perches - everything necessary to ensure the normal functioning of ducks should be freely available.

Perch for ducks made of plywood
Nest making
What does a typical domestic duck nest look like? The ideal option is when it has a roof, which gives the impression of security and privacy. A threshold from below is required, it will not allow the masonry to roll out and the litter to fall out.
For musky ducks, it is preferable to choose a tree as a material for building a nest with your own hands. It can be simple plywood, slab, tes or another type of wood. A diagram of an acceptable design is shown below.
What material is required:
- plywood;
- wooden slats 6 pcs. 40 cm long and 2 pcs. 50 cm;
- nails or screws
- saw;
- ruler;
- pencil.

Duck nest drawing
Progress:
- cut out of plywood: 2 square parts, their dimensions are 40x40 cm;
- in one of them, at a height of 9 cm, a hole is made on the side or in the middle, its size is 17x17 cm, this will be a hole;
- further, it is required to make 2 more parts, the length of the side walls is 50 cm, the height is 40 cm;
- ceiling 1 pc. size 40x50 cm;
- then, the frame of the structure is made from the rails;
- all parts are fixed on the rack frame, the base nest is ready.
The bottom can not be nailed, but you should not use iron as a floor when building a house for ducks. Since the material is quite hard, and ducks, trying to hide their eggs, bury them in the litter, and this is fraught with cracking of the shell.
The finished house is placed directly on the plank floor, and a deep bedding is laid down. So that the eggs do not get dirty and pathogens do not collect on them, it needs to be updated periodically. Indochki usually rush in the early morning, so the change of straw is done in the evening, so the cleanliness of the shell is ensured.
You can make a nest and an ordinary box measuring 400x500x20. For these purposes, any other suitable object is suitable: a small barrel, a dog kennel. The main condition is that the bird likes this house.

Duck perches are conveniently made of wood
Place for a nest
The correct location of the nest is important: on the one hand, the bird should be in silence and solitude, on the other hand, it is important to provide the owner with free access to inspect the nest, clean it, change the litter, and collect eggs.
It is best if the houses for each laying hen are located in different parts of the house.
When this is not feasible, and simple boxes are used as nests, they should be separated from each other by partitions so that future mothers do not conflict. It is better to place them on a small elevation from the floor, 20 cm is enough.
It is good when the bird cannot follow the movement of the owner and other inhabitants of the barn from the nest, so the houses are placed sideways or with their backs to the aisle. And while she is incubating the eggs, it is preferable to visit the barn as little as possible.
It is not recommended to place boxes near cold and damp walls.
The bird itself often helps to choose a place; it sits for a long time in the part of the shed that it likes.

To choose a place for a nest, you need to notice where the Indochka likes to sit.
How to teach a duck to rush in the nest?
Sometimes ducks, especially young ones or those who have moved to a new place of residence, do not always understand where they are to rush, and lay their eggs directly on the floor or ground. Then they need to be accustomed to new nests:
- At home, it is better to place them in the poultry house since the fall, then the bird will have time to get used to them, choose a corner you like.
- You can put an egg made of gypsum or chalk in the boxes, when she sees it, she will immediately figure out where to rush.
- Sometimes, in order to teach the stubborn to rush in the right place, they close it in the barn for a while.
- When collecting eggs for storage, it is impossible for the ducks to see how the owner takes them, they are able to leave the nest and start hiding, then it will be more difficult to teach them again.
When the owner sees that the duck not only covers the eggs with hay, but also plucks the fluff, covers the nest with it, this means that it is preparing for incubation.
Having made a nest with your own hands, properly positioning it in the house, providing proper care and nutrition, you can be sure that wonderful healthy ducklings will hatch in due time.


Popular
- Where to get start-up capital for a business
- How to name a company: examples of names
- Making money in Sims
- How to make money while traveling How to make money while traveling
- All profitable business niches
- All profitable business niches
- Top bucks that pay in dollars
- Earning on comments
- Similar to vktarget. Vktarget reviews. How to get more tasks on the VKtarget project - basic recommendations
- How to start earning in the game Farm Neighbors?