Nikon d610 year of release. Nikon D610 digital camera
Today we are testing a very interesting camera - Nikon D610. On the one hand, this is an advanced full-frame SLR camera for serious work, on the other hand, this is the most affordable model from Nikon's full-frame line, and it will be of interest primarily to those amateur photographers who decide to switch to full frame from simpler models. The camera also has many automatic modes that will be useful for beginners, there are also purely professional functions that will help you create photos and videos of excellent quality. Who will be interested in Nikon D610? Our test will try to answer this question.
It's a bleak winter, slowly turning into spring. Gray low sky, slush underfoot, incessant nasty runny nose, wet feet. I really don't want to shoot anything in this weather. I want to crawl under a warm blanket and sit in front of the fireplace on long dark evenings with an interesting book, without going out at all. What kind of photography is there, what full and incomplete shots ... However, as soon as the bright sun looks out, and even on a day off, all the people rush out of the city, to parks, museums, ski resorts and just to the forest, away from the dusty metropolis, and almost everyone has a large black SLR with a huge lens around their neck, or a smaller mirrorless camera, and many simply shoot with a smartphone and enjoy a good mood.
Video film - our program "Photo Fire!"
In our video, we briefly reviewed the ergonomics of the Nikon D610 camera, the principles of setting the main modes, gave examples of shooting photos and videos, as well as two examples of Time Lapse time-lapse photography. The film was shot by the authors and is an appendix to this article.
Test Methodology
All photos taken with Nikon D610 (firmware 1.00) equipped with AF-S NIKKOR 24-85mm f/3.5-4.5G ED VR lens, all shots in RAW format (14-bit, lossless compression), SDHC UHS-I Memory Card Transcend SDHC 32GB 300x Class 10 Adobe program Lightroom 5.7, all photos are shown without artistic processing, as they were taken on camera, the necessary retouching was carried out for portraits.
Comparison of the main characteristics of Nikon D610 and Canon EOS 6D
Ergonomics Nikon D610
What did you like
- Secure grip, comfortable body, control as in the latest models of DSLRs - D7100, D750, everything is familiar and everything is in its place. It makes no sense to list the basic principles of the settings - everyone who shot with Nikon cameras will instantly understand, for beginners it is enough to remember the main point: we press the control button of one or another parameter (for example, ISO) and change the value of this parameter with the wheel. We monitor on the top or main screen. Everything is simple and logical.
- Control wheels with locking parameters - set mode never fails by accident. We hold the camera with the right hand, press the button with the index finger of the left hand, turn the upper wheel with the thumb; in the case of the lower wheel, it is more convenient to press the button with the thumb, turn it with the index finger.
- Large additional screen on the top edge- it is convenient to read the values, besides, you can save battery power if you constantly use the upper screen without using the main screen for setting purposes.
- Screen protector- a moot point. It is rather useful, as it protects the screen from damage and does not interfere at all when shooting. If it seems to someone that she spoils appearance, the cover can be removed.
- Two SD memory cards are very convenient! Frankly, we are used to the fact that modern Nikon DSLRs have two memory cards, and it is no longer comfortable to use other cameras with one card.

What did not like
1. Shooting options and Live View. One of the most significant disadvantages is that when using Live View in photographing mode, when changing the aperture and shutter speed, the digital values on the screen, although they change, visually, these changes do not affect the picture on the screen, which misleads the user. There is no live histogram in Live View mode, which is not so critical compared to the result of changing parameters that is not displayed.
2. Aperture in video shooting mode. In Live View mode, when shooting a video, you cannot change the aperture, you can change the shutter speed, ISO, white balance and some other parameters, but changing the aperture is not available. Directly when shooting a video, the aperture change, if necessary, is smooth, without jumps, as on more professional models (for example, the Nikon D750 can smoothly change the aperture). A discrete change in aperture will inevitably lead to jumps in brightness, although in some cases it is better to have a jump in brightness than to continue shooting with incorrect settings.
3. OK button when viewing. Pressing the OK button while viewing a photo does not magnify the photo on the screen as with older models. To enlarge a fragment of the frame, you need to click on the magnifying glass with a plus sign several times.
4.Built-in mono microphone. The camera records video well, but the built-in microphone is monophonic. Saves the connector for an external stereo microphone, only in this way it will be possible to record stereo sound.
Shooting a portrait
The aperture at the long end is 4.5 ... this is, of course, not 1.4 or 2.8, as on fast fixes, however, it is quite possible to blur the background with this lens.

 |
 |
| 50mm f/4.5 | 85mm f/8 |
|---|

 |
 |
| 85mm f/4.5 | 50mm f/4.2 |
|---|

 |
 |
| 70mm, f/5.6 | 80mm, f/5 |
|---|
Shooting landscapes
Thanks to a versatile lens and a chic sensor, the camera allows you to capture great landscapes, especially when traveling. You can safely take this camera on a trip - it is simply created for travel reporting. The focal length of the whale lens - 24 mm - will allow you to shoot wide sea or mountain landscapes, and if you wish, you can set 85 mm and zoom in on the subject or take a series of excellent portraits. In the evening, it is not necessary to take a tripod with you - you can safely raise the ISO to 6400 and shoot urban scenes with your hands, and there is a built-in flash for evening portraits.

 |
 |
 |
 |
 |
 |
 |
Panorama of 5 horizontal, focal length 24mm, 1/60 at f/5.6, ISO 100:

 |
 |
 |
 |
 |
Indoors, with mixed light, auto white balance does a great job:
 |
 |
 |

autofocus
AF-A- Auto Servo AF: The camera automatically selects single-servo AF if the subject is stationary and continuous servo AF if the subject is moving.
AF-S- single-frame tracking focus: for shooting stationary objects. Focus is locked when the shutter button is pressed halfway. At default settings, a picture can only be taken when the in-focus indicator is displayed
AF-C- continuous tracking focus: for shooting moving objects. The camera focuses continuously while the shutter button is pressed halfway; if the subject is moving, the camera will engage predictive focus tracking to predict the final distance to the subject and adjust focus. At default settings, the frame can be taken whether the subject is in focus or not.
You can select focus points:
Single point autofocus: used for stationary objects.
Dynamic AF: in AF-A and AF-C modes, the camera will focus based on information from surrounding focus points if the subject moves out of the selected point for a while. The number of focus points depends on the selected mode:
- Dynamic, 9 points
- Dynamic, 21 points
- Dynamic, 39 points
3D Tracking: in AF-A and AF-C modes, the camera will track subjects that have left the selected focus point and select new focus points as needed.
Auto-area AF: The camera automatically detects the subject and selects the focus point. When a type G, E, or D lens is used, the camera can distinguish human faces from the background to improve subject detection.
In Live View mode, the camera can focus:
AF-S- single-servo focus: for shooting still subjects - focus is locked when the shutter button is pressed halfway.
AF-F- continuous focus tracking: for subjects that move - the camera focuses continuously while the shutter button is pressed; focus is locked when it is pressed halfway.
In live view, the following AF area modes can be selected:
- Face priority autofocus- for shooting portraits.
- Wide autofocus area- for shooting landscapes and other subjects handheld.
- Normal autofocus area- for precise focusing at a selected point in the frame.
- AF Subject Tracking- The focus point will follow the selected subject as it moves through the frame.
Lens included
The camera came to us for testing with a kit lens AF-S NIKKOR 24-85mm f / 3.5-4.5G ED VR - this lens is well known to everyone who shoots on Nikon cameras - an affordable kit lens that comes with full-frame cameras. In the case of this optic, whale - does not mean "simple" - the lens provides excellent optical performance and covers the most popular focal lengths - from a wide angle of 24 mm with a minimum aperture of 3.5 for landscapes and urban scenes to classic 85 mm portraits with aperture of 4.5.

The lens has a built-in ultrasonic autofocus motor, thanks to which it focuses instantly and almost silently, equipped with image stabilization 2nd generation (VR II). The lens produces good sharpness in the center of the frame, but the resolution at the edges and corners is much worse.
Test: focal length 24mm, ISO 100, F11
 |
 |

 |
 |
Test: focal length 50mm, ISO 100, F11
 |
 |

 |
 |
Test: focal length 85mm, ISO 100, F11
 |
 |

 |
 |
The disadvantages of the lens are noticeable barrel roll, vignetting and chromatic aberration, these parameters can be compensated both by the camera itself (for shooting in JPEG), this is turned on in the menu, and using software when processing, for example in Lightroom 5.7 in the case of RAW. The average price of this lens according to Yandex Market for February 2015 was 21,800 rubles.
Alternatively, consider the even more versatile Nikon 24-120mm f/4G ED VR AF-S Nikkor lens - a constant f/4 aperture at all focal lengths and 120mm at telephoto would be clear advantages, but such a lens is more expensive by about 10,000 rubles.
Using DX Lenses
The D610 can be fitted with any DX lens that is specifically designed for Nikon crop factor cameras. Of course, such lenses are equipped with exactly the same mount, so they will be installed without problems, the only problem is strong vignetting at the edges at a wide angle.
To reduce the effect of vignetting when installing DX lenses, you need to specify the frame size in the menu not FX, but DX (see screenshot below), the camera uses only part of the matrix and there will be no vignetting effect. In our opinion, if a full-frame sensor is already installed in the camera, it is better to use its full potential, and do such a trick only when necessary. The only plus is that the coverage area of the autofocus points will get very close to the edges of the frame, and we will be able to focus almost anywhere in the frame.

Nikon D610 with DX NIKKOR 18-55mm 1: 3.5-5.6 G VR lens
 |
 |
| On focal length 18mm noticeably stronger vignetting | Now you need to enable DX in the menu |
|---|---|
 |
 |
| The viewfinder will display a full frame, but a crop frame will be drawn in the center, this is how the frame will be shot | In Live View mode, the camera immediately crops the frame to DX size |
ISO sensitivity test
At this point in the review, I would like to make a small digression. , we first encountered Nikon's full-frame DSLRs, before that we only tested models with a crop factor. And the amazing quality that the matrix in the Nikon DF camera produced at almost all ISOs, up to 51200, seemed to us in the order of things. We were glad and decided that this is the norm for all Nikon full-frame DSLRs.
Friends, this is not true. See how much Nikon DF costs. This is despite the fact that the camera does not shoot video, there is no battery handle for it, it has an outdated processor, the screen is not rotatable, the battery is rather weak, the battery compartment lids are frail ... The Nikon DF camera has one indisputable advantage that easily and naturally puts on both blades any DSLR on the market, excluding only the top-end Nikon D4S (there is exactly the same matrix) and Canon 1D (of course, we do not take into account medium format cameras and the just announced Canon 5DSR). This advantage is its chic matrix.
We invite you to look at the ISO test that we shot on the Nikon D610. Shooting options: aperture priority F / 8, NEF format, all processing like noise reduction at slow shutter speeds and high ISOs are turned off. Click on the photo - increase 1:1. The quality of the Nikon D610 gives out quite suitable for work, so do not look Nikon test DF, and don't compare, no need to get upset.
 |
 |
 |
| 50 | 64 | 80 |
|---|---|---|
 |
 |
 |
| 100 | 125 | 160 |
 |
 |
 |
| 200 | 250 | 320 |
 |
 |
 |
| 400 | 500 | 640 |
 |
 |
 |
| 800 | 1000 | 1250 |
 |
 |
 |
| 1600 | 2000 | 2500 |
 |
 |
 |
| 3200 | 4000 | 5000 |
 |
 |
 |
| 6400 | 8000 | 10000 |
 |
 |
|
| 12800 | 25600 |
Extended dynamic range
Classic HDR with exposure bracketing
We put a lot of emphasis on HDR shooting in every report, and there are many reasons for this. Firstly, even the coolest modern matrices are unable to convey the range of brightness that we see with our own eyes at the shooting location, and secondly, this style allows you to turn on the fantasy and creatively process the frame, making it more dramatic.
In the Nikon D610 camera, AE bracketing can be selected:
- 2 frames: one of which will be shot with a normal exposure, the second either in plus or minus to choose from.
- classic 3 frames with fork 0.3, 0.7, 1, 2 or 3 steps.
The Nikon D610 camera allows you to shoot only three exposures in a series, so all that remains is to choose the fork on the spot. We most often make two series - with a 2 or 3 plug, as it is sometimes difficult to decide which brightness spread is suitable for a particular scene. A narrower fork than 2EV, in our opinion, is meaningless - such a result is easier to achieve by processing one RAW than messing around with a series and subsequent gluing.
Plug 2 example

 |
 |
 |
| -2EV | 0EV | +2EV |
|---|
Fork example 3

 |
 |
 |
| -3EV | 0EV | +3EV |
|---|
A few more HDR shots with different processing:
 |
 |
 |
 |
Setting options in the menu
In-camera HDR
The camera also has an automatic HDR stitching mode, it is included in the menu and works only when shooting in JPEG - the camera itself will take a series of two frames and glue the finished file. In order for the camera to remember the fact that this mode is turned on, you need to set the “series”, otherwise, before each next shot in the HDR style, this function will have to be reactivated in the menu.
You can adjust the fork (in the menu it is called “Exposure Diff”) and the hardness of the processing (for some reason it is called “Softening”). As practice shows, special miracles from shooting in this mode should not be expected. For the example below, we made a landscape in all modes and compared the result with the classic HDR, which was shot at the same time from the same point. Comments, as they say in such cases, are superfluous.
 |
 |
 |
| HDR Off | HDR Auto, Normal | HDR 1EV Normal |
|---|---|---|
 |
 |
 |
| HDR 2EV Normal | HDR 3EV Normal | HDR 1EV |
Classic HDR with three exposures, shot in RAW from this point and assembled in graphics editor:

 |
 |
 |
| -2EV | 0EV | +2EV |
|---|
Active D-Lighting
This is a feature of all Nikon DSLRs, we test this mode every time we work on camera reviews. And every time the work of this function causes bewilderment - why? There is not much difference in the photo, and when processing RAW in a graphics editor, you can easily achieve more interesting results. And another strange moment: this function does not affect the raw file, only JPEG. Or rather, not quite so: when you open NEF in Nikon's program, Capture NX-D, information about Active D-Lighting will be read, and the file will be displayed according to the settings for this parameter. If you work with this NEF in any other editor, there is no point in using this function, rather, it makes sense to turn it off so as not to waste energy.
An example of how Active D-Lighting works
 |
 |
 |
| ADL AUTO | ADL moderate | ADL normal |
|---|---|---|
 |
 |
 |
| ADL reinforced | ADL Super Reinforced | ADL Off |
IN this example photos with ADL turned off look a lot cleaner and more interesting, while super boosted mode adds a gray veil to the photo.
Setting options in the menu
 |
 |
 |
| Shooting in JPEG | Setting Active D-Lighting | HDR setting |
|---|
Shooting video
The main video parameters are configured in the menu before shooting: quality and frame rate (we shot 1920 × 1080 24p), memory card number. Many settings can be adjusted when switching to video mode before recording has started. And some parameters can be changed right during the recording of the video.
If you set creative mode to M and switch to movie mode, but do not start recording yet, you can configure many recording options. A picture will appear on the screen, already cropped to a 16:9 format, which is good, and then:
What can be customized:
- excerpt
- white balance
- Brightness
- Microphone level
- picture control
- Autofocus mode and move the autofocus area
What can't be configured:
- Aperture - turning the wheel does not change the aperture value and does not affect the picture in any way
- Exposure compensation - changing exposure compensation is visually displayed on the screen, but it does not affect the picture in any way
If you start recording video, then right during the shooting of the video you can change:
- excerpt
- white balance
- Brightness
- Autofocus mode and move the autofocus area
The built-in microphone is monophonic, the sound in the video will be flat, which does not decorate the video at all. But the most difficult thing is to adjust the aperture, because no matter how you turn the front control wheels, there is zero sense. And in the field, when you urgently need to shoot, you start to turn different wheels in a hurry and press all the buttons in a row, eventually setting the parameters at random. Well, if you guessed it.

Examples of shooting video on the Nikon D610 are shown in our video
Interval shooting - Time Lapse
The camera can shoot a classic version interval shooting- frames after a period of time specified by the photographer. In this case, we get a series of files as output, which will need to be assembled into a video clip on a computer in an editing program, such as Adobe Premiere or Adobe After Effects.
Time-lapse video- everything is the same, only the camera will glue the final video on its own, and the resolution and frame rate will be copied from the video recording settings.
Important points when shooting Time Lapse
- When shooting Time Lapse V without fail turn off autofocus! If this is not done, the camera will focus again when shooting a new frame, which will inevitably lead to focus jumps in the video. If, when shooting a photo or even a video, this is not noticeable to the eye, then in the case of Time Lapse, this fact will completely ruin the video. And besides, the battery power will be wasted. An example of an unsuccessful shooting is given in our video - shooting the evening MIBC Moscow City, we forgot to turn off autofocus. The second example in the video turned out to be more successful, where we turned off all the automation altogether.
- It's a mistake to select shutter priority mode. or program P - the camera, when shooting each next frame, will re-evaluate the exposure and choose some kind of aperture, which will inevitably lead to a change in brightness from frame to frame, which in turn will lead to flickering in the frame. Aperture must be clearly set.
- It is better to refuse automatic ISO selection, you must select and set the desired value.
- Set the desired white balance but not automatic. On a cloudy day it can be a cloud, on a clear day it can be the sun. Otherwise, the white balance can also “walk” from frame to frame, which will inevitably lead to color jumps in the video.
- floating exposure. If you choose aperture priority, say f/8, then the camera will reselect the shutter speed every next frame, lengthening it as it gets dark in the evening, and shortening it at dawn. When shooting on a bright day, this can again harm the video if the sun hides behind a cloud, after which it looks out again and so on - brightness jumps are inevitable. Or a passerby will accidentally appear in the frame - for the picture this will only add dynamics, but we are provided with a jump in brightness.
Multiple exposure
Like most modern Nikon DSLRs, the D610 can shoot multiple exposure style shots. Overlay 2 or 3 frames is available, while you can shoot in RAW. By default, the maximum time between exposures is 30 seconds, this time can be extended using Custom Setting c2 (Standby timer). As with HDR, the menu can be set to On. (series) or On (single shot) - in the first case, the camera will take one multiple exposure, and you can start shooting the next, while in the second case, after shooting one multiple exposure, the camera will automatically switch this setting to Off.
There is also such a parameter as "Auto Gain". This setting should be adjusted to your taste, the manual does not give any specific recommendations in this regard, except that it suggests disabling auto-gain if the background is dark.
Shooting in multiple exposure style is not an easy creative task. If in the case of HDR you can at least roughly imagine what the future frame will look like (for example, mentally darken the sky and brighten the shadows on the ground), when shooting Time Lapse, you can again mentally speed up the movement of clouds in the sky or the course of any events, then in the case of multiple exposure, it is incredibly difficult to imagine the future frame.
Anyone interested in multiple exposure can be recommended to study the works of the masters, and you can start with the works
In addition, the body of the Nikon D610 is perfectly protected from moisture and dust. The location of all rubber pads is the same as in the D600. You should not check the waterproofness of the camera in the pool, but you can safely shoot in the rain and snow. Just do not forget that the lens must also have an appropriate degree of protection - not all "glasses" in the Nikon collection can boast of this.
Display, viewfinder, interface
An additional display pleases not only with a pleasant green backlight, but also with information content. In this parameter, it surpasses the similar screen in Canon cameras.
The software interface will not be new, perhaps, to anyone who has ever held any Nikon DSLR in their hands. In its unchanged form, the menu migrated from the Nikon D600, and there was simply no reason for the changes. Here we have six main sections - the playback mode menu, photo and video shooting mode settings, a set of user settings, a general settings menu, an image processing menu, and an arbitrary user menu. Menu items are also provided with fairly detailed tips, and Russification is one of the most competent and understandable.
co interchangeable optics, 35.9 x 24 mm sensor, 27.4 megapixels, 1920 x 1080 pixel video, 141x113x82 mm, 850 g
Why does everyone love the Nikon D610 digital camera?
Professional camera will appeal to both beginners and experienced photographers. With it, you can take high-quality pictures and record decent videos.
Image quality
The 24.3 megapixel matrix retains sharpness as accurately as possible and conveys rich colors. The camera is capable of shooting smooth Full HD videos. It is now possible to capture motion at up to 6 fps: this is especially true when shooting competitions and other activities. The Quiet Shutter mode makes continuous shots virtually silent, so animals and birds won't notice your presence.
HDR
High dynamic range photography is suitable when the subject appears too contrasty. Bright and dark areas create noise, which the desired mode can reduce.
Performance
The ISO value varies from 100 to 6400. If necessary, the upper limit can be increased to 25,600 units. This is done in low light conditions to get sharp and clear images.
Possibilities
Wireless transfer allows you to quickly send the footage to a tablet, computer or smartphone. There are two slots for SD memory cards - use one for photos and the other for video.
Exploitation
The top and back covers are made of magnesium alloy. It withstands harsh conditions of use. The tightness class protects the filling from dust and moisture penetration.


INTRODUCTION
Nikon D610 appeared on the market a long time ago, replacing D600. But to this day it remains one of the very few full-frame non-professional cameras. Moreover, in fact, it was “work on the mistakes” - replacing the problematic shutter mechanism, which actively collected dirt, and there were very few innovations compared to the 600th:
- New shutter mechanism (actually what the index was updated for);
- Added Qc silent continuous shooting mode at 3 fps;
- Reworked white balance;
- The maximum shooting speed has increased from 5.5 to 6 frames per second.
To date Nikon D610 is the most affordable full-frame reflex camera. The closest "main competitor" in the face of the Canon EOS 6D is slightly more expensive (prices were compared on Hotline.ua), while there is also a certain parity in terms of characteristics - each has its pluses and minuses.

APPEARANCE and DESCRIPTION Nikon D610
D610 is an advanced amateur DSLR in a classic form factor. All controls are much closer to cameras with a 4-digit designation (D5300, D7100) and differ from professional Nikon D4s.
The case is grippy, durable, without backlash and other "roughness". Naturally, the camera is not light and rather large (compared to non-full-frame counterparts and mirrorless ones). At the same time, in contrast to the same D800/D810, the case is only half a metal structure, the front of the camera is plastic. And by the way, the D610 on this moment Nikon's only full-frame camera built outside of Japan.

From convenient - the usual (for an amateur) dial for switching shooting modes with a "cherished green icon" AUTO and a set of automatic presets - SCENE. For me, these modes are useless, but they save a lot of nerves when you need to give the camera to a person far from photography, without doing his / her theoretical photo training. In addition, I am glad that this very disk is blocked from accidental scrolling with a key. As, however, the wheel surrounding it for selecting the shutter operating modes is also blocked - which is also convenient and protects nerve cells.

Of the features - mode Qc, which allows you to shoot a "silent burst" at a speed of 3 frames / sec. The sound from his work is really muffled, so that the camera can be taken to a report where you can’t draw attention to yourself. There are no complaints about the rest of the "scatter" of buttons and controls either, everything is familiar and as it should be. From nit-picking - I would still share the buttons AF-L/AE-L. It is clear that this is an amateur camera, but on the other hand there is plenty of space on the body and nothing prevented them from being placed side by side, and not combined into one.

It is also worth noting the dust / moisture protection of the case, so I used the camera (with the AF-S NIKKOR 24-70mm f/2.8G ED lens, also protected) with a clear conscience even in drizzling rain without fear for its “health”.
Screen D610- 3.2 inches, it is, of course, not touch and not swivel. And if seasoned professionals may not need such a “body kit”, then mere mortals really lack it. Shooting from the floor, like shooting from the crowd - holding the camera above your head - could be much more convenient.
It seems that either the dissatisfied grumbling of users, or the pleas were heard, and in the later screen is already rotary.
At D610 huge chic and very bright viewfinder with 100% frame coverage and 0.7x magnification. In addition to the standard shooting parameters, you can display a digital level and a digital grid on it. It is very convenient to have a second monochrome display - all information is always in sight.

SPECIFICATIONS and FUNCTIONALITY Nikon D610
The camera has an autofocus module - Nikon Multi-CAM4800 with TTL phase detection and 39 focus points, including 9 cross-shaped ones. You can set the operating modes to display 11 or 39 points, you can set the zone focus to one, 9, 21 and 39 points. Moreover, 7 central cross sensors can focus with lenses with aperture less than F / 8, which makes it possible to focus in very low light conditions. He (the module), with minor processing, migrated from the "crop segment", respectively, the main disadvantage is a small frame coverage - in fact, only the central part.

Yes, the speed of his work did not cause any complaints, and to “catch” the rushing high speed the car was no problem. But now, if you turn on tracking autofocus, then the coverage area is no longer enough ... I would like the location of phase sensors throughout the frame.
In mode live view only contrast focusing works, and it is very slow. In addition, the camera does not have any assistive functions for manual focusing in mode. live view- no focus peaking, no zebra. The only thing is an increase in the focus area, with an approximation of up to 16 times. Taking into account amateur positioning, it would be possible to add some of the "assistants".


CONCLUSIONS:
Nikon D610- an excellent full-frame "SLR", which, like all cameras Nikon equipped with a “screwdriver” necessary for normal operation AF- lenses and supports the entire fleet of old manual optics for bayonet F. For the "advanced" amateur there is the usual convenient control. The professional who needs a camera that is not as heavy and bulky as D810 or D4S, will appreciate the excellent picture quality, low noise and wide dynamic range, in other words - all the advantages of a classic full-frame SLR camera.
In addition, the body of the Nikon D610 is perfectly protected from moisture and dust. The location of all rubber pads is the same as in the D600. You should not check the waterproofness of the camera in the pool, but you can safely shoot in the rain and snow. Just do not forget that the lens must also have an appropriate degree of protection - not all "glasses" in the Nikon collection can boast of this.
Display, viewfinder, interface
An additional display pleases not only with a pleasant green backlight, but also with information content. In this parameter, it surpasses the similar screen in Canon cameras.
The software interface will not be new, perhaps, to anyone who has ever held any Nikon DSLR in their hands. In its unchanged form, the menu migrated from the Nikon D600, and there was simply no reason for the changes. Here we have six main sections - the playback mode menu, photo and video shooting mode settings, a set of user settings, a general settings menu, an image processing menu, and an arbitrary user menu. Menu items are also provided with fairly detailed tips, and Russification is one of the most competent and understandable.
-
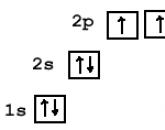 Electronic configuration of an atom
-
 How to connect electricity to the house and the plot: where to go, what you need and how much it costs How to choose a Wi-Fi adapter for a computer: external and internal
-
 How to decorate an office, study or workplace for the New Year: original ideas Decorate an office for the New Year
-
 DIY Christmas decoration
Popular
- Celebration of the day of agriculture and processing industry
- When is Agriculture Day celebrated?
- Card games at the table
- Funny and funny contests for a fun company of adults
- Polish "paratroopers" for the Soviet marines
- Project 205 missile boats
- How is life on the new Chinese destroyer
- The newest frigate "Admiral of the Fleet Kasatonov" is preparing for the first tests and going to sea Ship Admiral Kasatonov
- Submarines of the Gato type
- Insignia on the merchant fleet of the USSR Detachment of the II group