How to maximize internet connection speed. How to maximize the speed of your Internet connection Choosing the best browser
In most cases, speed problems are related to the tariff or malfunctions on the side of the provider or user equipment. However, there are times when the slowdown is due to software settings or malfunctions. In this case, you can try to correct the situation on your own. Let's figure out how to speed up the Internet on Windows 10, what needs to be done for this, etc.
All overclocking options can be divided into the following categories:
- removal of restrictions in the operating system;
- removal of restrictions in third-party programs;
- fixing errors and updating the firmware in the router / modem;
- using settings for slow internet;
- network optimization using third-party software.
One of the listed methods will definitely help you make the connection faster and more stable. Next, all methods will be considered in the form of step-by-step guides, as well as ways to check the speed.
How to check speed
First, measure the speed of your connection using a special service. This is necessary in order to verify the data with your tariff plan. It is possible that the Internet is not limited by anything, but fully corresponds to the declared speed. In this case, you need to use services to measure speed, ping and other parameters.
- The most popular option is to check at Speedtest.net. To do this, go to the site http://www.speedtest.net/ through any browser and click the Begin Test button.

- Next, automatic selection of the nearest server and speed measurement will begin.

- At the end of the procedure, you will see Download and Upload Speed, Ping data on the screen. Check the received information with the data of your provider about the tariff plan.

The Windows 10 operating system has a built-in network test feature that can be used through the Task Manager. To view the network load, do the following:
- Call the task manager with the keyboard shortcut Ctrl + Shift + Esc . Go to the "Processes" tab and click on "Network" to sort the list as you use the Internet.

- At the top of the list will be all the processes that somehow use the network for their work. If you have a slow home Internet, then close some of them. You can see more information about the load on the network in the "Performance" tab. At the bottom of the window, click the "Open Resource Monitor" button.

- The "Network" tab contains all the processes related to working on the Internet. You can close them with RMB and the "End Process" button.

After rebooting, the computer will again use these processes, so it will not be possible to completely get rid of the problem with loading the network channel. Let's move on to the removal of restrictions in the system.
Now let's deal with the settings and limitations of the OS on a laptop and PC. After installation, Windows 10 by default limits the connection speed and reserves part of the channel for system purposes (update, etc.). To optimize the Internet experience, you need to remove the bandwidth limit through the computer configuration. After that, the operation of the connection should stabilize, and the speed should increase slightly.
To remove the restriction, follow these steps:
- Open the Run window using the Start menu or the Win + R keys. Next, enter the gpedit.msc command and click OK.

- You will see the Local Group Policy Editor. Go to the branch Computer Configuration - "Administrative Templates Network" - "QoS Packet Scheduler".

- In the right part of the window, find the line "Limit reserved bandwidth" and click RMB. Then select "Edit" from the menu.

- In the window, set the "Enabled" option. In the field for changing the network bandwidth limit, set "0" and apply the changes with the "OK" button.

- Now you need to check if your network connection is using QoS Scheduler. To do this, right-click in the tray on the connection icon (1) and select "Network Control Center".

- Now go to the "Change adapter settings" section.

- Right click on your connection and go to properties.

- Check the box next to QoS Packet Scheduler and apply the changes with the OK button.

Ready! Optimization helped to increase the speed by about 10%, which were reserved by the system. If acceleration in this way did not help much, then proceed to the following methods.
Diagnostics by standard means
You can also use the standard diagnostic wizard to check if the connection is working. The program will scan the network and display the status and the need to correct errors.
To run the diagnostic tool, do the following:
- Right-click on the tray icon and select Troubleshoot.

- Wait until the end of the diagnosis and look at the result.

If no problems are found, proceed to the next steps.
Restriction in programs
Part of the software installed by users is connected to the network. Such programs can limit the Internet and make it extremely slow. In addition, they may have speed limits. To return the Internet to working capacity and improve it, you need to use our advice.
The main program in which most users try to speed up the connection is uTorrent. Increasing the Internet Speed parameters is possible through the settings.
Open uTorrent. Click on the required RMB download and select the "Reception Restriction" item from the menu. In the next section, you must set the "Unlimited" option in order to overclock the torrent to the maximum.

You can do this for a while while you are downloading a particular file or game via uTorrent. If you have very poor Internet and the channel is not enough for all your needs, then turn off some programs before the download is complete. After the torrent has finished downloading, you will be able to start the Internet-related software (Steam, Skype, and so on) again. That way you get the most out of your rate.
Browser settings and cache size
If problems arise when working in a browser (pages take a long time to load, it is impossible to watch a video, etc.), then use special features. Consider enabling turbo mode in Opera, Yandex.Browser and Chrome.
To set up turbo mode in Yandex.Browser and Opera, use the instructions below:
- In Opera, you need to click on the browser icon in the upper left corner (1), then select the Opera Turbo button (2).

- In Yandex browser, go to Settings. Click on the "Show advanced settings" button. In the Turbo subsection, set the position to "Always on" (1). To disable the function, move the checkbox to the "Off" position (2).

In this way, you can limit the number of multimedia files on web pages (pictures, videos) and, therefore, speed up the loading of sites.
- In the Google Chrome browser, you need to install a separate plugin - Data Saver. It will help remove the brakes to reduce the waiting time when loading pages of sites. To do this, open the extension store in your browser and click the "Install" button.

- Now, by clicking on the extension icon, you will receive information about the saved traffic.

If the connection also continues to slow down, then proceed to the next troubleshooting methods.
Increasing the cache size for an internet browser can lead to slowdowns. It is not recommended to allocate more than 100 MB for the cache on the system drive. To fix this, you need to go to the browser settings and set the desired value (1), and then clear the cache using the special button (2).

In this way, the cache size is set in Mozilla Firefox and Opera. In Google Chrome and Yandex browser, the procedure looks different, since they are assembled on the same Chromium core:
- Open the properties of the shortcut on the desktop.

- In the Object field, add the command:
where xxxxx is the desired number of cache in bytes.

Virus check
Malicious software can also significantly affect the performance of the Internet. To increase the speed, you need to scan the system for viruses and remove them. You can use third-party programs or the built-in Windows 10 Defender. Let's scan the system for viruses using the Defender:
- Go to system settings through "Start".

- Select the "Update and security" section.

- Next, go to Windows Defender.

- Click the "Open Windows Defender Security Center" button.


Working with a router
If you have a laptop, then most likely you are using a Wi-Fi router and a wireless connection. This type of connection is unstable and the speed can drop at any time if you are using mobile Internet. If the wired provider is connected to the router, but the connection still slows down, then you need to reconfigure the device itself.
Through a Wi-Fi router, you can:
- change firmware;
- reconfigure the connection again.
You can do this online using a browser. Therefore, you do not need special skills or knowledge to work with iron.
All router firmware differ in interface, but the essence remains the same. Consider the update on the example of a device from ASUS:
- First you need to log in to your ASUS account using the device's IP address. In this case it is 192.168.1.1. You need to enter it in the address bar of the browser, and then log in using the login and password that the provider gives you when concluding the contract.

- Next, go to the "Administration" tab (1) and select the "Firmware update" section (2).

- You must download the firmware file in advance from the official website of the router developer and upload it using the "Select file" button (1). To start the update, click on "Submit" (2).

- Wait for the software to update and reboot your device.
Now let's look at how to raise the Internet by reconfiguring:
- The first step is to reset the old settings. To do this, go to "Administration (1) -" Restore / save / load settings "(2). Here click on the "Restore" button (3).

- Wait until the factory settings are restored and log in to the system again. Next, go to the "Quick Setup" tab and follow the instructions.

If this does not help, then use the services of the master of your provider. It is possible that the problem lies in the router itself and it needs to be replaced with a new one.
Additional programs
The last option to regain fast Internet is to use the optimizer functionality.
One such program is Internet Speed Booster or cFosSpeed. You can download cFosSpeed from the link. With it, you can optimize the Internet for games, video streaming or torrents. Install the utility and follow these steps to set the priority:
- Right-click on the tray icon and select "Options" - "Settings".

- Next, go to the "Programs" tab (1). All programs are divided into categories. We go, for example, in "Games" and use the slider to change the priority for the online game from low to high (2). Now the connection will be directed to work with the game.

- Protocols are prioritized in the same way.

- In the "General Settings" section, you can set automatic priority to the active application. When you minimize a game or program, the Internet speed will increase in other applications.

Outcome
Each of the methods presented in the instructions can help increase the speed of the Internet on Windows 10 in a certain situation. If all methods were ineffective, then contact the support service of your provider for advice and assistance.
Video
For greater clarity, we suggest watching a video that corresponds to the topic under consideration.
From the Internet. It is especially acute for users who use it outside the city. Today we will talk about how you can increase the speed of the Internet in the Windows 7 operating system.
This method was once tested when the connection to the network was provided via a 3G modem. The connection speed was not always stable and often dropped. Therefore, a decision was made by removing all restrictions set by the operating system. We start by increasing the throughput of the port. To do this, go to "Start", then go to the "Control Panel", there select "System". We get to the "Equipment" tab. Here you need to click "Device Manager", where select "Ports (COM and LTP)". The content immediately expands, where you need to find “Serial Port (COM1)”, after which, using the right button of your manipulator, select “Properties” and, after a new window has opened, click on the “Port Settings” tab. There we find "Speed" and select 115200, then OK. This completes the speed up process. By default it is 9600 bps.

Here it is very important to take into account one nuance, namely, which port is used to connect the modem. It is very easy to find out. Go to the "Control Panel", then go to "Phones and Modems", where you find the "Modems" tab, here the port will be indicated. If you do not know the name of your modem, do this: double-click on the connection icon, which is located on the desktop. On it, right-click the manipulator, select "Properties" and the tab "General". A window will appear in which the modem used will be indicated, and in some cases the port. You can also do the following: click "Start", select "Connections", after which a list of all connections will be displayed. Find yours and see the properties.

Next, to increase the speed of the Internet, you need to increase your connection channel. Click "Start", select "Run", where you write "gpedit.msc" and click OK. In the window that appears, find the item called "Computer Configuration", and select it. Now you go to "Administrative Templates", then "Network", after - "qos Package Manager" and finally "Limit Reserve Bandwidth". Now on the tabs find "Option" and select "Enabled". Take a close look at the "Bandwidth Limit" dialog box that appears, in which you select the value "Zero percent" instead of twenty.
With this method, I managed to increase the speed of the Internet by more than twenty percent. I'm sure you can do it too. If you are using either a wireless connection, skip the paragraph about increasing the port speed. In this case, you will be able to increase the speed of the Internet by exactly twenty percent. There are still several ways to do this with the help of some programs, but this is a separate topic for discussion.
Almost every user wants the connection speed of his computer to the World Wide Web to be as high as possible. This issue is especially relevant for low-speed data networks, in which, as they say, every KB / s counts. Let's find out how to increase this figure on a PC with Windows 7 operating system.
It should be noted right away that it is simply impossible to increase the Internet speed parameters beyond those that the network bandwidth can provide. That is, the maximum data transfer rate declared by the provider is the limit above which it will not work to jump. So do not believe the various "miracle recipes" that are supposedly capable of speeding up the transfer of information at times. This is possible only when changing the provider or switching to another tariff plan. But, at the same time, the system itself can act as a certain limiter. That is, its settings can reduce the bandwidth even below the bar set by the Internet operator.
In this article, we will explain how to set up a computer on Windows 7 so that it is able to maintain a connection to the World Wide Web at the highest possible speed. This can be done both by changing certain parameters within the operating system itself, and by using some third-party programs.
Method 1: TCP Optimizer
There are a number of programs that are designed to optimize the settings for connecting a computer to the World Wide Web, which, in turn, leads to an increase in Internet speed. There are quite a few such applications, but we will describe the actions in one of them, which is called TCP Optimizer.

Method 2: NameBench
There is another application to speed up the speed of receiving data from the network - NameBench. But, unlike the previous program, it does not optimize computer settings, but searches for DNS servers through which communication will be as fast as possible. By replacing existing DNS servers in the connection properties with those recommended by the program, it is possible to increase the speed of loading sites.
- After downloading NameBench, run the installation file. It is not necessary to have administrative rights. Click Extract. After that, the application will be unpacked.
- In field "Query Data Source" the program itself selects the browser that is most suitable in its opinion, which is installed on this computer, for verification. But if you wish, by clicking on this field, you can select any other web browser from the list. To start searching for DNS servers, click Start Benchmark.
- The search procedure is in progress. It can take a significant amount of time (up to 1 hour).
- After the end of the test, the browser that is installed on the computer by default will open. On his page, the NameBench program in the block "recommended configuration" will display the addresses of the three recommended DNS servers.
- Without closing the browser, do the following manipulations. click "Start", sign in "Control Panel".
- In the block "Network and Internet" click on position "View network status and tasks".
- In the window that appears "Network Control Center" in the parameter group "Connect or Disconnect" click on the name of the current network, which is listed after the parameter "Connection".
- In the window that appears, click "Properties".
- After launching the window in the component block, select the position TCP/IPv4. Click "Properties".
- In the window that appears, under "Are common" scroll down to the bottom of the options. Set the radio button to position "Use the following DNS server addresses". The bottom two fields will become active. If they already have some values, then be sure to overwrite them, as some operators only work with certain DNS servers. Therefore, if, due to further changes, the connection to the World Wide Web is lost, then the old addresses will have to be returned. In field "Preferred DNS Server" Primary Server browser. In field "Alternate DNS Server" enter the address shown in the field Secondary Server browser. click OK.


After that, the speed of the Internet should increase slightly. In the event that you cannot access the network at all, return the previous settings of the DNS servers.
Method 3: Setting up the package scheduler
The value of the parameter under study can be increased by changing the setting of the package scheduler.
- Call the remedy "Run", applying Win+R. Drive in:
click OK.
- A window opens "Local Group Policy Editor". In the left area of the shell of this tool, expand the block "Computer Configuration" and click on the folder name "Administrative Templates".
- Then move to the right side of the interface, click on the folder there "Net".
- Now enter the directory "QoS Packet Scheduler".
- Finally, after going to the specified folder, click on the item "Limit Reserved Bandwidth".
- A window is launched that has the same name as the item we clicked on earlier. In the upper left part of it, set the radio button to the position "Turn on". In field "Bandwidth Limit" be sure to set the value «0» , otherwise you risk not increasing the speed of receiving and transmitting data over the network, but, on the contrary, reducing it. Then click "Apply" And OK.
- Now you need to check if the packet scheduler is enabled in the properties of the network you are using. To do this, open the window "State" current network. How this is done has been discussed in Method 2. Click the button "Properties".
- The properties window for the current connection opens. Make sure that opposite the item "QoS Packet Scheduler" checkbox has been checked. If it is, then everything is in order and you can just close the window. If there is no checkbox, then check it, and then click OK.


After that, you will most likely get some increase in the existing level of Internet speed.
Method 4: Setting up a network card
You can also increase the network connection speed by adjusting the power supply of the PC network card.
- Navigate with the menu "Start" V "Control Panel" just as we did above. Go to the section "System and safety".
- Next in the settings group "System" go to point "Device Manager".
- window starts "Device Manager". On the left side of the window, click on "Network adapters".
- A list of network adapters installed on the computer is displayed. This list can contain one element or several. In the latter case, you will have to perform the following operations with each adapter in turn. So, click on the name of the network card.
- The properties window opens. Move to tab "Power Management".
- After the corresponding tab is opened, check the checkbox next to the item "Allow the computer to turn off this device". If the mark is present, then it should be removed. Also, if available, uncheck the box. "Allow this device to wake the computer from sleep", unless, of course, this item is generally active for you. click OK.
- As mentioned above, do this operation with all the elements that are located in the group "Network adapters" V "Device Manager".


If you are using a desktop computer, there will be no negative consequences after applying these steps. The function of waking up a computer from sleep mode with a network card is used very rarely if you need, for example, to communicate with a turned off computer remotely. Of course, when deactivating the ability to turn off the network card when it is not used, the power consumption increases slightly, but in reality this increase will be minimal and will have almost no effect on the level of power consumption.
Important: for laptops, disabling this feature can be quite significant, as the rate of battery discharge will increase, which means that the period of operation of the device without recharging will decrease. Here you will need to decide what is more important for you: a small increase in Internet speed or a longer laptop operation time without recharging.
Method 5: Change the power plan
You can also achieve a certain increase in the speed of data exchange with the World Wide Web by changing the current power plan.


The fact is that in the economy mode or in the balanced mode of operation, the supply of electricity to the network card, as well as to other components of the system, is limited. By performing the above actions, we thereby remove these restrictions and increase the performance of the adapter. But, again, it is worth noting that for laptops, these actions are fraught with an increase in the rate of battery discharge. Alternatively, to minimize these negative effects when using a laptop, you can switch to a higher performance mode only when using the Internet directly or when the device is connected to the mains.
Method 6: Extending the COM Port
You can also increase the connection speed on Windows 7 by expanding the COM port.


Thus, the port throughput will be increased, which means that the Internet speed indicator will also be increased. This method is especially useful when using high-speed networks, when the provider provides a higher connection speed than the one configured on the computer's COM port.
You can also give some general tips that will improve the speed of the Internet. So, if you have a choice between a wired connection and Wi-Fi, then in this case, choose the first one, since a wired connection operates with less loss than a wireless one.
If it is not possible to use a wired connection, then try to place the Wi-Fi router as close to the computer as possible. If you are using a laptop that is not connected to the mains, then, on the contrary, you can sit with it closer to the router. Thus, you minimize signal transmission losses and increase Internet speed. When using 3G modems, place your computer as close to a window as possible. This will allow the signal to pass as freely as possible. You can also wrap the 3G modem with copper wire, giving it the shape of an antenna. This will also provide a certain increase in data transfer speed.
When using Wi-Fi, be sure to set a connection password. Without a password, anyone can connect to your point, thereby “taking” part of the speed for themselves.
Be sure to periodically scan your computer for viruses, using not a regular antivirus, but specialized utilities, such as Dr.Web CureIt. The fact is that many malicious programs use a computer to transfer data to its "owner" and other manipulations through the network, thereby reducing the connection speed. For the same reason, it is recommended to disable all unused toolbars and plug-ins in browsers, since they also transmit and receive information that is often useless to the user through a network channel.

Another option to increase the target is to disable your antivirus and firewall. But we do not recommend using this method. Of course, antiviruses somewhat reduce the speed of receiving data, passing them through themselves. But by disabling protection tools, you run the risk of picking up viruses, which in turn will lead to the opposite of the desired effect - the Internet speed will decrease even more than with the antivirus program turned on.
As you can see, there is a fairly wide list of options to increase the speed of the Internet without changing the tariff plan and provider. True, you should not deceive yourself. All these options can give only a relatively small increase in the value of this indicator. At the same time, if you use them in combination, and not be limited to the use of any one method, you can achieve significant results.
Are you satisfied with the speed of your Internet connection? Do you know that by changing just one parameter, you can speed up the Internet, that is, increase the connection bandwidth by 20 percent?
A long time ago, when the Windows XP operating system was installed on most users' computers, and only a small part of the lucky ones had high-speed Internet, this method allowed the user (for example, me personally), though not by much, but to increase.
Today, when in big cities you can’t surprise anyone with super speeds and basically the only question before the user is how much to pay for the Internet (the more expensive the faster), this method will not give a tangible acceleration. But in villages and small towns, where it is problematic to get high speed, even these cut 20% will come in handy.
By default, in Windows 7, the QoS packet scheduler limits the reservation to twenty percent of the bandwidth of an Internet connection. Therefore, if we change this parameter in the QoS settings, we can accordingly increase or decrease the bandwidth reserved by all programs that run on the computer.
On many sites there is information that changing this parameter does not affect the Internet connection in any way, but in my case, according to the tests, changing it still leads to an increase in speed. See for yourself (the difference is approximately 3 Mbps in receive and 0.15 Mbps in transmission).
Now let's proceed directly to setting up the package scheduler in the Windows 7 operating system. Open the browser, go to the site:
http://www.speedtest.net/ru
and measure the speed before changing the settings. After that, launch the Local Group Policy Editor. Using the keyboard shortcut Win + R, open the “Run” system utility, where in the “Open” field we write “gpedit.msc” and click the “OK” button, thereby launching the “Local Group Policy Editor”.

HOW TO SPEED UP THE INTERNET
Go to "Administrative Templates" - "Network" - "QoS Packet Scheduler" and double-click on "Limit Reserved Bandwidth".

We put a mark on the “Enable” position, in the “Parameters” window we replace the value of 20% with 0%, click the “Apply” and “OK” buttons.

Now you have learned how to speed up the Internet. Again, we measure and see what happens. How has your internet connection speed changed? Please share information in the comments.
What gets on your nerves more than? Perhaps only the "turtle" Internet! Tired of looking at the endless rotation of the cursor while waiting for the site to open? Or wait forever for the file to load? If so, it's time to act.
This article is for those who value their time and preserve their peace of mind. Read how to increase the speed of the Internet in all possible ways. Spend half an hour once and this problem will never bother you again. And if it happens again, you will know how to solve it.
How to increase internet speed
Is your plan right for you?
The first Internet bandwidth limiter is your ISP. It is he who sets the upper speed limit, which you cannot bypass. More precisely, you can, but for an additional amount.
To find out if the real Internet speed matches the one you pay for, go to any test site, for example, Speedtest.net or, and take measurements. To get the most reliable indicator, close the VPN applications and browser proxy extensions (if you use them), and also disconnect other traffic consumers (computers, phones, TV, etc.) from the network.
If the result is not much different from the declared, then the Internet is slowing down due to the fact that the line bandwidth is too small for your needs. The solution is to change the tariff to a faster one. Don't want to overpay? Take a look at offers from other providers.
If the speed is 30-50% lower than prescribed in the contract, then the reason is not in the tariff plan. Short-term delays during the daytime are the norm, and constant ones, especially at night when the line is not loaded, are a reason to call technical support.
In some cases, the speed decreases when a certain traffic threshold is reached (this should be mentioned in the description of the tariff plan), in others - due to malfunctions (both from the provider's side and from yours) and other reasons.
If the provider's technical support did not help, move on.
We are looking for "devourers" of traffic
The slow operation of the Internet may be due to the fact that a "eater" of traffic has settled on the computer - a program that clogs a significant part of the Internet channel with its data. Such a "devourer" can be:
- Torrent clients. Especially running on multiple computers at the same time.
- Viruses - worms, spammers, etc.
- Operating system and applications while downloading updates. Especially when there are many such applications, and the connection is not very fast.
- Cloud service clients during data synchronization (Microsoft OneDrive, Dropbox, Evernote, Yandex drive, Google drive, etc.).
- A browser minimized to the taskbar with many open tabs.
To see which processes are actively using the network, run Task Manager, go to the tab " Performance' and click on the link ' Open Resource Monitor».

IN Resource Monitor open the tab " Net' and expand the list of processes. To see what share of traffic is consumed by any process, check its box.

The presence of unknown objects in this list, as well as the high network activity of operating system processes, is a reason to scan your computer for viruses.
Checking if there are "left" connections
If you use a wireless access point to access the Internet, .
After that, open the section " Traffic monitoring” (if any) and see how traffic is distributed between devices. If among them there is a clear leader in consumption, you need to look for the source of the problem first of all on it.

We identify and strengthen the "bottlenecks" of the equipment
Network cables
Let's start with a simple one - by checking the cables between computers and the router, as well as between the router and the provider's equipment. Bad contacts, creases, close proximity to sources of electromagnetic interference (for example, to power lines) significantly impair signal transmission. If you find a problem, fix it if possible.
Router (router)
The router is the second most common culprit in reducing the speed of the Internet. In the home segment, budget models with low speed characteristics are common. A device bought for 2-3 thousand rubles is unlikely to give you the feeling of flying, especially if you connect more than 3-4 consumers to it. The maximum speeds, which are indicated in the characteristics of inexpensive devices, are almost never achieved in reality. At best, it will be half. If when using a router, the quality of the Internet connection decreases, and when you connect the cable directly to the PC, it increases, it is obvious that this is exactly your case.
To get the most out of a weak router, update its firmware to the latest version and place it in a place in the apartment where every connected device will catch a Wi-Fi signal well. Do not place the router close to heat sources, as overheating is another reason for its slowdown.
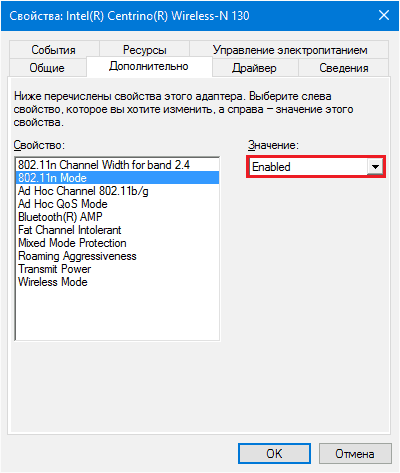
In the Wi-Fi hotspot settings, make the following settings:
- Wireless network mode– 802.11n standard. If possible, disconnect all devices that work according to 802.11b / g standards from the access point so that the speed is not limited by the level of their capabilities (802.11b mode works at 11 Mbit / s, 802.11g - at 54 Mbit / s, 802.11n - at 600 Mbit /s). If you have such devices and they need the Internet, connect them via cable.
- To maintain a speed of more than 54 Mbit / s, activate the " WiFi Multimedia» ( WMM).
- Experiment with broadcast channel width. Choose between 40 MHz and 20 MHz. With low and unstable signal levels, a 20 MHz channel often provides better bandwidth than 40 MHz. Auto 20/40 also doesn't always work optimally.
- Use authentication method"WPA2-PSK", encryption algorithm - "AES". Disabling encryption completely will increase the performance of the router even more, but it will make your network open to everyone, and this is not secure.
- Find the optimal broadcasting channel using the enumeration method (option " Channel» in the wireless network settings).
- Select the optimal power of the wireless signal transmitter (option " TX power"). Sometimes lowering it significantly improves the quality of the transmission.

LAN card
Outdated drivers and some network adapter settings can slow down communication performance. Start by updating your drivers to the latest version - download them from the website of your computer motherboard manufacturer or laptop manufacturer and install them like a regular application.
After that, launch the Windows Device Manager, open the list " Network adapters" And " Properties» of the one you are using.

If you are connecting via cable, go to the " Additionally" and set the value of the parameter " Speed & Duplex» to the maximum possible for the device. Choose from two options full duplex» (in this mode, the adapter receives and transmits information at the same time).

On a similar tab of the properties of the wireless adapter, set the priority for operation in 802.11n mode (the option may be called " 802.11nmode», « 802.11npreamble» « 802.11n direct connection mode", etc.) and just like on the router, enable support WMM (« Wi-FImultimedia" or " Multimedia and gaming environment»).
Choosing the fastest DNS server
DNS servers - hosts that map the domain names of devices and websites to IP addresses - are essential components of any Internet connection and also affect its speed. Some of them are faster, others are slower, some are geographically closer to you, others are further away. Some are loaded heavily, others are lightly loaded.
To determine the fastest and closest DNS server to you, we will use the free Namebench utility from Google.
Namebench runs on Windows, OS X and Linux platforms and is available in graphical and console versions. You can choose any, and I will tell you how to use it, using the graphic as an example.
The search for the optimal Namebench DNS server will be based on the time of opening web pages in browsers, data from network traffic analyzer utilities (tcpdump and winpcap) and some other information.
Once launched, Namebench will automatically detect your location and current DNS addresses. You only need to choose from the list " Querydatasource» maximum points for calculation (number in brackets). Above the dotted line of this list is a sample of your browsers, below - the standard test suites of the program itself.
To start the check, click " Start Benchmark».

Upon completion of testing, the result in the form of a table will open in Internet Explorer. Top right shows the recommended DNS servers - the fastest and closest to you. On the left, where I have “Fastest” written - how many percent is the best DNS faster than the current one.

- Go to the folder " Network connections" (via the context menu of the Start button or the "Network and Sharing Center").
- Open the context menu of your connection and select " Properties».

- In the list of components on the tab " Net» mark « IPv4". Press " Properties».
- Set the switch to " Use the following addressesDNS servers” and indicate there what the program advised.

Also change the DNS in the router settings:

Choosing the best browser
Open the same site in multiple browsers and make sure they load at different speeds. According to the results of comparative tests, Google Chrome, Mozilla Firefox, Opera and Yandex.Browser show the maximum performance. In addition, the last two have the "Turbo mode" option, which speeds up the opening of pages with a slow connection.
Also, to improve browser performance, do not forget to close extra tabs and disable unused extensions.
Using TCP Optimizer to speed up the Internet
There are many programs that promise to speed up the Internet by 100-200-500%, but most of them are paid and far from being as omnipotent as they are written about. I will talk about one of the free ones that does not give out empty promises, but simply works - the TCP Optimizer utility. It is able to increase network bandwidth by about 15-20% while supporting all types of connections.
Despite the many options, using the program is easy. The choice of optimal parameters is made automatically. To do this, you need to perform only a few operations:
- Run the utility with administrator rights (it does not require installation).
- On the scale " connectionSpeed» Specify the maximum speed of your connection.
- From the list " networkadapterselection» select the current network adapter.
- In the list " Choose settings» mark « Optimal».
- Click " applychanges” and restart your computer to apply the settings.

In automatic mode, TCP Optimizer itself sets the optimal parameters of the TCP window (the main network protocol) for a given connection speed. And if you want to understand the program in more detail, in order to change its settings manually, there is a .
That's all I wanted to say on today's topic. Of course, in the vastness of the global network you can find a lot of other tips on how to speed up the Internet by 1000%, but some of them are outdated for a long time, and some are frankly harmful (like suggestions to abandon antivirus and disable Windows updates). And the main advice is this: speed up, but keep a reasonable balance between online comfort and data security on your PC. After all, the second, whatever one may say, is more important than the first.


Popular
- how to make a million a month
- The most promising business ideas from America
- What is the best business to open?
- EICC network - free search for business partners in Russia and abroad
- Opening a smokehouse: a business plan
- What business is relevant now and what is in demand
- Opening a trampoline center from scratch Trampoline center idea
- Filling out product cards
- How to earn money sitting at home
- Tips for a new start-up!